Procedure to install or upgrade Cisco IOS
Cisco IOS is a proprietary operating system for Cisco devices. Cisco developed it primarily for its routers. Gradually, it implemented it on other devices. Currently, it uses it to manage multiple devices, including routers, high-end switches, and firewalls.
Like other operating systems, Cisco does not release bug fixes and updates as separate files. Instead of releasing bug fixes and updates separately, it merges them into the original IOS file and releases the updated IOS file.
To upgrade an existing IOS, you have to replace the existing IOS file with the newly released one. For every update, you have to install a new IOS image file from scratch. It sounds like a challenging task. However, installing a new IOS image file is not as tricky and complex as installing other operating systems.
Installing and updating a Cisco IOS image file
Installing and updating a Cisco IOS image file is a three-step process.
- Download the new IOS image file containing updates and bug fixes.
- Use a file transfer protocol to copy the downloaded file to the router's flash memory.
- Delete the old IOS image file, or configure the router to use the new one.
Lab setup
You can use a real router or a router in a simulator software for practice. A simulation software lets you learn this process without messing with a real device. This tutorial uses Packet Tracer. Packet Tracer is a network simulator software. It allows you to simulate all essential Cisco devices.
Open Packet Tracer and click the 'End Devices' icon. Drag a Server and a PC-PT from the end devices, then drop them into the workspace.

Click the 'Routers' icon. Drag an '1841 series' router from the available routers and drop it in the workspace.

Click the 'Connections' icon. Connect the FastEthernet0/0 interface of the Router to the FastEthernet0 interface of the Server and the console port of the Router to the RS232 port of the PC-PT via a cross cable and a console cable, respectively.

Access the Router's CLI prompt and assign an IP address to FastEthernet0/0.

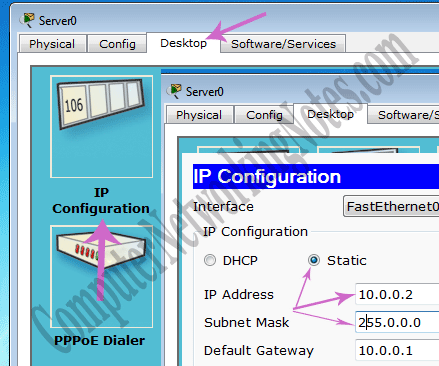
Assign an IP address from the same subnet to the Server's FastEthernet0 interface.
Click PC-PT, click the Desktop menu, click the Terminal icon, and click the OK button to accept the default settings.

The following link provides this lab.
Pre-built Packet Tracer LAB for the practice
Using real devices
If you are using real devices, you have to take a few additional steps. The following table lists them.
| Step on the real devices | Purpose or reason | Step on Packet Tracer |
| Connect the router to a PC or laptop via a console cable, then access the router's CLI prompt. | During this process, you will execute a few commands on the router. For this, you need to access the router's CLI prompt. | Connect the PC0 and the Router via a console cable. |
| Connect the router to the same PC or another PC via an Ethernet cable. | Routers do not allow the data connection on the console port. To transfer a new IOS image file from the TFTP server to the router, connect the TFTP server to the router on its data port, such as an Ethernet port. | Connect the Server to the Router on the Ethernet port. |
| Download and install a TFTP server program on the PC connected to the router via an Ethernet cable. | Routers support the TFTP protocol. The TFTP protocol allows you to transfer files between a TFTP server and a TFTP client. | A TFTP server is pre-installed on the Server. |
| Download the IOS image file you want to install from Cisco's official site, then copy or move it to the root directory of the TFTP server. | The TFTP protocol can only read from the root directory of the TFTP server. | The Sever system contains some IOS image files in the TFTP server's root directory for practice. |
Routers store IOS image files in Flash memory. If there is only one IOS image file available in flash memory, the router automatically uses it as the default IOS image. If multiple IOS image files are available, it uses the first accessible image as the default IOS image.
When a router starts, it loads the default IOS image from Flash memory into RAM and uses it until the next boot. It means that when a router is running, and you delete its default IOS image file from flash memory, the router will keep working until the next boot. In other words, during the running state of the router, you can safely delete the existing IOS image file and install a new IOS image file.
Installing or updating the Cisco IOS software
Whether you use a real Cisco router or Packet Tracer, the commands for installing and updating Cisco IOS software are the same. Access the router's CLI prompt and enter Privilege Exec mode.
Use the show version and show flash commands to view the name of the running IOS and all available IOS image files in Flash. The show version command displays the name of the running IOS. The show flash command lists all the IOS image files available in Flash memory.

Check connectivity between the router and the TFTP server that contains the downloaded image file.
Router#ping 10.0.0.2

Run the following command to download the new IOS image from the TFTP server to Flash memory.
Router#copy tftp flash

This command requires three parameters.
Address or name of remote host:- Specify the IP Address of the TFTP Server.
Source filename:- Type the exact name of the IOS image file that you want to download from the root directory of the TFTP server.
Destination filename:- If you want to install this IOS image file with a different name on the router, type the new name. Press Enter to use the default name. The default name is the source filename.
Use the show flash command to verify the downloaded file.

To instruct the router to use the new IOS image file when it boots next time, you have two options:-
- Set the new IOS image file as the default IOS image file
- Delete the old IOS image file, leaving only the new one available in flash memory
To set the new IOS image file as the default IOS image file, use the following command.
Router# boot system flash: [ name of the new IOS image file]
This command does not work on Packet Tracer. If you execute this command on Packet Tracer, you will get the 'command not found' error. Packet Tracer uses a stripped-down version of IOS, and this command is not available in that version. This command is available in the full version of IOS. If you are using a real router or an emulator (such as GNS3) that runs the full version of IOS, you can use this command.
On Packet Tracer, you can use the second option. Delete the running IOS image file, leaving the newly downloaded IOS image as the only available IOS image on flash. Use the following command to delete the running IOS image file.
Router#delete flash: [ name of the running IOS image file]

After setting the new IOS image file as the default or deleting the running IOS image file, reboot the router. Use the 'reload' command to restart the router.

After the reboot, the router will use the new IOS image. You can verify this by using the 'show version' and 'show flash' commands again.

Conclusion
Understanding how to install or update an IOS image file is crucial for maintaining optimal performance and security in Cisco devices. Installing or upgrading Cisco IOS is straightforward. You can perform it in three steps: download the new iOS image, transfer it to the router's flash memory, and configure the router to use it. By following these steps, you can easily install or update the IOS image file.
Author Laxmi Goswami Updated on 2025-12-02