Password aging policy Explained with chage command
The password aging policy is a group of pre-defined security policies. Most of these policies are time-based. They allow administrators to define various time frames for user passwords. These time frames force users to use their passwords according to the organization's security policy.
The password aging policy consists of the following seven settings.
- Last password change date
- Password expiry date
- Password inactive date
- Account expiry date
- Minimum number of days between password changes
- Maximum number of days between password changes
- Number of days of warning before password expires

Last password change date
It is the date when the user last time changed his password. The password aging policy uses it to calculate the dates of the following two settings.
Password expires date
It is the last date till the changed password remains valid. After this date, the password becomes invalid. The password aging policy calculates this date from the first and sixth settings.
Password expiry date = Last password change date + Maximum number of days between password changes
Password inactive date
It is the last date to use an expired password. After this date, if the expired password is not changed, the user account will be locked. This setting takes a value in the day format but displays that value in the date format.
Password inactive date = Password expiry date + Password inactive days
Account expiry date
It is the last date till the user can use his account. After this date, the account locks. This setting is not based on or calculated from other settings. Administrators individually define it.
Minimum number of days between password change
These are the minimum number of days that must elapse before the user can change his password again. The password aging policy calculates these days from the last password change date.
Maximum number of days between password change
These are the maximum number of days till the password remains valid. The password aging policy calculates these days from the last password change date.
Number of days of warning before password expires
It is the number of days the user will get a warning message to change his password before the password expires. The password aging policy calculates it from the password expiry date in reverse order.
The password aging policy example
A user account has the following password aging policy.
| Minimum number of days between password changes | 2 |
| Maximum number of days between password changes | 20 |
| Number of days of warning before password expires | 5 |
| Password inactive date | 3 |
The user changes his password on 1 January. Based on the above policy, the following facts will become true.
- He cannot change his password again till 3 January.
- He can use the password till 20 January.
- From 16 January, he will get a warning message to change their password while logging in.
- If he does not change his password till 20 January, his password will expire.
- After 21 January, he can log in with the expired password but can not perform any task apart from changing his password. In other words, the system will force him to change his password just after the logging in.
- If he does not change his password by 23 January, on 24 January, the system will lock his account.
- Only administrators can unlock the locked account.

The user changes his password on 20 January. After that, the following facts will become true.
| Last password change date | 20 January. |
| Not allowed to change the password again til this date | 23 January (20 January + 2 days) |
| Password expiry date | 9 February (20 January + 20 days). |
| Starting date of warning message for password change | 4 February (9 February – 5 days) |
| Password inactive or account lock date | 12 February (9 February + 3 days) |

The default password aging policy
The following table lists the default value of password aging settings.
| Setting | Default value |
| Last password change date | User creation date |
| Password expiry date | Never |
| Password inactive date | Never |
| Account expiry date | Never |
| Minimum number of days between password changes | 0 day |
| Maximum number of days between password changes | 99999 days |
| Number of days of warning before password expires | 7 days |
The /etc/login.defs file
The /etc/login.defs file saves the default values of login parameters and security policies for user accounts. Until we manually configure these values for a user account, the system uses the default values for that account.
The following image highlights the password aging settings section.

The following table lists the meaning of directives.
| Directives | Value | Description |
| PASS_MAX_DAYS | 99999 | Minimum number of days between password change |
| PASS_MIN_DAYS | 0 | Maximum number of days between password change |
| PASS_MN_LEN | 5 | Minimum length of the password |
| PASS_WARN_AGE | 7 | Number of days of warning before password expiry |
The minimum length of the password defines the minimum required length for the user password. For example, if the value of this policy is five, a user cannot select a password having less than five characters.
The /etc/shadow file
The /etc/shadow file saves passwords and the password aging settings for individual user accounts. When we add a new user account, the system adds an entry at the end of this file for that user account. This entry contains the user password and password aging settings. If we do not customize the password aging settings while creating the user account, the system uses the default values saved in the /etc/login.defs file to populate the /etc/shadow file entry.

The chage command
The chage command lists and updates the password aging settings. This command uses the following syntax.
#chage [option] username
Listing password aging settings
The –l option lists the current settings of the password aging policy.
Example
- Add a new user account.
- The system uses the default settings until we manually configure password aging settings.
- Use the chage -l command to list the default password aging settings.
#useradd rheluser
#passwd rheluser
#chage -l rheluser

Updating/changing the default password aging settings
We update the /etc/login.defs file to change or update the default password aging settings.
Example
- Make a backup copy of the /etc/login.defs file.
- Open the /etc/login.defs file
- Set the Minimum number of days between password changes to 3
- Set the Maximum number of days between password changes to 30
- Set the Number of days of warning before the password expires to 5
- Save the file
- Add a new user account
- List the default password aging settings of the new user account
#cp /etc/login.defs /etc/login.defs.backup
#vim /etc/login.defs
  PASS_MAX_DAYS     30
  PASS_MIN_DAYS     3
  PASS_MN_LEN       5
  PASS_WARN_AGE     5
#useradd rheluser1
#passwd rheluser1
#chage -l rheluser1

Only new user accounts will get the updated settings. All existing accounts will use their current settings.
Example
- Lists the default password aging setting of the rheluser user (user account created before we updated the /etc/login.defs file.)
- Lists the default password aging setting of the rheluser1 user (user account created after we updated the /etc/login.defs file.)

Managing the password aging policy of the existing accounts
The change command allows us to manage or update the default password again settings for user accounts. It provides two ways to update the password aging options: -
- update all settings through the interactive prompt
- update an individual setting through the command line option
Updating all settings through the interactive prompt
The following command updates all settings through the interactive prompt.
#chage [username]
The above command starts an interactive series of prompts to set the required value for each option of the password aging policy. It also displays the current value of each option in brackets. If we specify a new value for an option, the new value will replace the existing value. If we do not specify a new value, the system will continue using the existing value.
Example
- List the password aging settings of the rheluser user
- Update the default password aging policy for the rheluser user using interactive prompts.
- List the password aging settings of the rheluser user again to verify the update operation
#chage -l rheluser
#chage rheluser
#chage -l rheluser

Updating individual settings through the command line option
The following table lists the options that update the individual settings of the password aging policy.
| Short option | Long option | Update setting |
| -d | --lastday | Last password change date |
| -m | --mindays | Minimum number of days between password change |
| -M | --maxdays | Maximum number of days between password change |
| -W | --warndays | Number of days of warning before password expiry |
| -I | --inactive | Password inactive date |
| -E | --expiredate | Account expiry date |
Changing the last password change date
The last password change date automatically updates when the user changes his password. But if required, we can also set this date manually using the -d option. For example, the following command sets the last password change date to 10 August 2024 for the rheluser user.
#chage –d 2024-08-10 rheluser
Since the password aging policy uses this date to calculate the dates for the password expires and password inactive settings, their dates also change when we change this date.

Forcing a user to change his password at the next login
The value zero (0) with the -d option immediately expires the user password. The system will force the user to change his password at the next login. The following command expires the password of the rheluser user.
#chage –d 0 rheluser

Changing password inactive days
The -I option changes the number of days after the system locks the user account if the user does not change his expired password. The following command changes the password inactive days to 5 days for the rheluser user.
#chage –I 5 rheluser

The value -1 with this option resets the password inactive days back to the default value.
#chage –I -1 rheluser

Changing password warning days
The -W option sets the number of days earlier the user will get the warning message to change his password before the password expires. For example, the following command sets the warning message days to 5 days before the password expires for the rheluser user.
#chage –W 5 rheluser

Changing the minimum number of days between password changes
The -m option changes the minimum number of days between password changes. For example, the following command sets the minimum number of days between password changes to 8 days for the rheluser user.
#chage –m 8 rheluser

To reset this value back to default, specify the value 0 with this option.

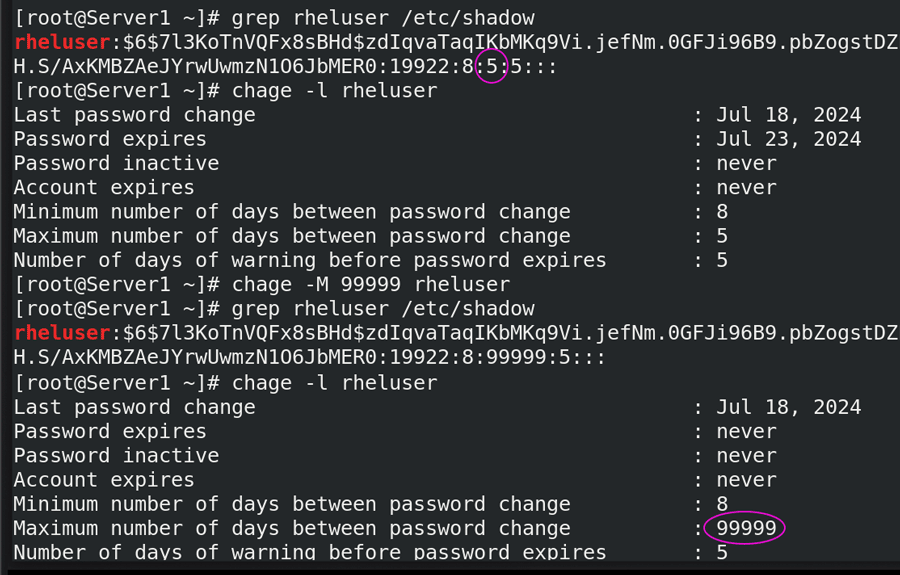
Changing the maximum number of days between password changes
The -M option changes the maximum number of days between password changes. For example, the following command sets the maximum number of days between password changes to 5 days for the rheluser user.
#chage –M 5 rheluser

Changing password expiry to Never
The password expiry setting is directly related to the Maximum number of days between password changes setting. When we change the value of the Maximum number of days between password changes, the system automatically calculates the password expiry date from the last password change date. Since the password expiry setting depends on the setting Maximum number of days between password changes, if we restore the default value of the setting Maximum number of days between password changes, the default value of the password expiry setting also automatically restores. The value 99999 resets the password expiry setting back to never. For example, the following command restores the default values of both settings for the rheluser user.
#chage –M 99999 rheluser
Changing account expiry date
The default account expiry date is never. The -E option allows us to set an account expiry date or update the existing account expiry date.
For example, the following command will set the account expiry date to 20 August 2024 for the rheluser user.
#chage –E 2024-08-20 rheluser

Turing off account expiry
The value -1 with the -E option resets the password expiry date to the default value. For example, the following command sets the account expiry date to the default value for the rheluser user.
#chage –E -1 rheluser

This tutorial is part of the tutorial series 'Linux User and Group Management Explained with Examples'. Other parts of this series are the following.
Chapter 01 Difference between the root user and super (sudo) user
Chapter 02 Linux User Management Explained with Examples
Chapter 03 Linux Group Management Explained with Examples
Chapter 04 Password aging policy Explained with chage command
Chapter 05 The /etc/group File Explained
Chapter 06 The /etc/gshadow File Explained
Chapter 07 The /etc/passwd file in Linux Explained with Examples
Chapter 08 The /etc/shadow file in Linux Explained with Examples
Chapter 09 The useradd command Explained
Chapter 10 The gpasswd command Explained
Chapter 11 The chage command Examples and Usages
Conclusion
The /etc/login.defs file saves the default password aging policy for new user accounts. The chage command lists and changes the password aging policy for existing users.
By ComputerNetworkingNotes Updated on 2026-04-10