Building, Testing, and Verifying a Custom RPM
Red Hat provides software in the form of packages. These packages are called RPMs. If you want to build custom software for RHEL-based systems, you need to know the steps required to create RPMs. This tutorial explains these steps in detail through an example.
Necessary tools
To build a custom RPM, you need the rpm-build and rpmdevtools packages. The rpm-build package provides the rpmbuild command. This command creates an RPM package from source code. The rpmdevtools package provides the rpmdev-setuptree and rpmdev-newspec commands. These commands create the necessary directory structure and configuration files. The following command installs the rpm-build package.
#dnf install rpm-build

The following command installs the rpmdevtools package.
#dnf install rpmdevtools

Creating a regular user account
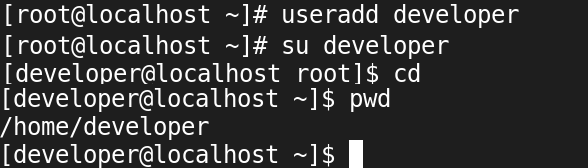
Typically, developers use regular user accounts for software development. To simulate a real-world scenario, create a regular account and switch the user account to it.
#useradd developer
#su developer
Change the working directory to the user's home directory.
$cd
$pwd
Setting up a directory structure for the RPM
The following directories are essential for an RPM.
| rpmbuild | This directory is the parent directory of all directories in the RPM. |
| BUILD | This directory provides scratch space for compiling. |
| RPMS | This directory stores the binary. |
| SOURCES | This directory contains the source code. |
| SPECS | This directory holds the spec file. |
| SRPMS | This directory contains the source RPM. |
You can manually create the above directories or use the rpmdev-setuptree command. This command places all essential directories in the correct location.

Adding the source code
A source code is compulsory. It provides the package's functionalities. For a basic RPM, you do not need any complex source code written in a programming language. You can use a simple text file as the source code. Make a directory outside the rpmbuild directory and create a sample file in it.
$cd
$mkdir sample_rpm
$cd sample_rpm
$cat > sample_file
This is a sample file in the test rpm.
Ctrl+D
$cd
$ls  sample_rpm
$cat sample_rpm/sample_file

The SOURCES directory keeps the source code in the archive format. Create an archive, add the text file to it, and move the archive to the SOURCES directory.
$tar cf sample_rpm.tar.gz sample_rpm
$ls
$mv sample_rpm.tar.gz rpmbuild/SOURCES/
$ls
$ls rpmbuild/SOURCES/

Creating a specification file
A specification file provides information about the package. All RPMs need and include it. Move to the SPECS directory and run the rpmdev-newspec command. This command generates a template file. You can use this template file to build a specification file.
$cd rpmbuild/SPECS/
$rpmdev-newspec
$ls

Open the generated template file for editing.
$vim newpackage.spec

Update the template file as shown in the following image.

| Directive | Description |
| Name | This directive sets the name of RPM. |
| Version | This directive sets the version of RPM. The default is 1. |
| Release | This directive sets the subversion and the RHEL version. The default is 1. |
| Summary | Small description of package contents. |
| License | License information under which you want to release this package. |
| URL | This directive allows you to set the URL of your site. |
| Source0 | Name of the archived source code file. |
| BuildRoot | Path of the parent directory that contains all necessary directories and the source code of the RPM. |
| %description | A brief description of package functionality. |
| %prep | Commands that prepare the source code. |
| %setup | Move the source code in the BUILD directory and decompress the archived file. |
| %install | Clean the build directory, copy the compressed file, and extract it. |
| %files | Files of the package |
| %clean | Clean all temporary files generated during this process. |
Building the RPM
The following command builds the RPM from the specification file and places it in the RPMS/x86_64/ directory.
$rpmbuild –v --bb newpackage.spec

You can build an RPM under the normal user account. But you cannot install it using the regular user account. To install it, you need root privileges. To verify this, install it using the same user account.
$ls RPMS/x86_64
$rpm -ivh
The rpm command installs the package. You can check the following tutorial to learn more about this command.
The rpm command in Linux Explained

Under a regular user account, it returns a 'permission denied' error. Exit the regular account to switch back to the root account. Under the root account, switch to the directory containing the custom RPM.
$exit
#cd /home/developer/rpmbuild/RPMS/x86_64/
#ls

Installing and verifying the custom RPM
Use the following command to install the package.
#rpm -ivh [package-name]
The package you created in this exercise installs a file in the /opt directory. You can check this file to verify the custom RPM.

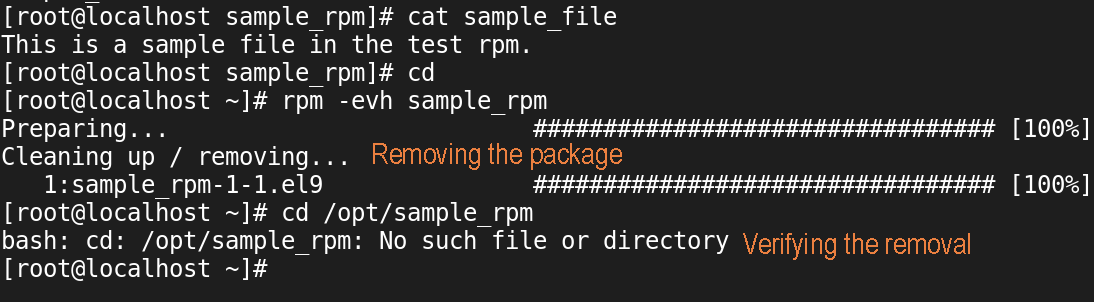
Removing the package
The following command removes the package.
#rpm -evh [package-name]
To verify the removal, you can recheck the file installed by the package.
Conclusion
This tutorial outlined the steps required to build, install, and test a custom RPM. Learning these steps helps you understand basic concepts and fundamentals of RPMs.
Author Laxmi Goswami Updated on 2026-02-16