The nmtui Command and Utility on Linux
The nmtui utility provides a curses-based application for managing Ethernet cards and connections. A connection is a collection of settings the Ethernet card needs to connect to the network. The following command starts the nmtui utility.
#nmtui

The first screen has the following three options.
Edit a connection: - This option allows us to add a new connection and manage existing connections.
Activate a connection: - This option allows us to activate or deactivate a connection on an interface.
Set system hostname: - This option allows us to change or set the hostname.
The Tab and Arrow keys allow us to move between the options. Each option has a sub-screen that we can access by pressing the Enter key. We can also access the sub-screen of these options directly from the command line.
The nmtui-edit command opens the sub-screen of the first option.
#nmtui-edit

Use the nmtui-connect command to access the second option's sub-screen.
#nmtui-connect

Use the nmtui-hostname command to access the third option's sub-screen.
#nmtui-hostname

Whether you use the first screen of the nmtui utility or the related command to access the sub-screen of an option, the settings available on the sub-screen are the same. The commands mentioned above only bypass the first screen of the nmtui command. From the sub-screen of an option, we can manage all settings related to the option.
Let's take an example to understand how to use each option and its settings. In this example, we will perform the following activities.
- Creating a new connection
- Activating the connection
- Changing the hostname
- Verifying the changes
- Deleting the created connection
The nmtui command examples
Select the first option (Edit a connection) on the first screen and press Enter.

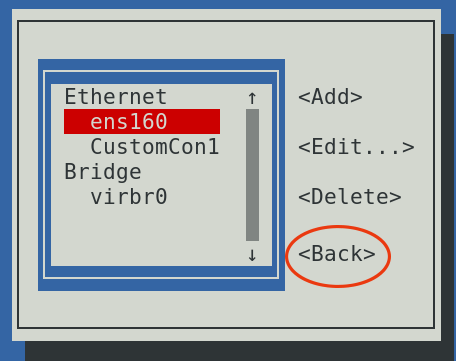
The next screen displays existing connections on the left side. On the right side, it shows options for managing them. Select the Add option from the right side to add a new connection, and press Enter.

The next screen presents all available types of network interfaces. Select the interface type matching the connection. You can make a connection for any network interface. However, you can use that connection only if that interface exists on the system. For example, you created a connection for an Ethernet interface. You can use this connection only if the system has an Ethernet card.
Select the Ethernet and use the Tab key to select the Create option. After selecting the Create option, press the Enter key.

The next screen allows us to customize the connection.
Set the Profile name to CustomCon1, IPv4 Configuration to Manual, IPv4 address to 10.0.0.10/8, and Automatically connect option to No.

To navigate between the options, use the Tab key. Use the Enter key to show the sub-options of the selected option. Use the Space key to toggle the state of checkboxes.
After updating all settings, select the OK button and press the Enter key.

The nmtui utility creates a new connection with specified settings and adds it to the list of connections. By default, it does not activate the new connection.
To activate the new connection, select Back and press the Enter key.
On the first screen, select the second option, Activate a connection, select OK, and press the Enter key.

Select the recently added connection, move to the Activate option, and press the Enter key. Then, move to the Back option, and Press Enter.

So far, we have added a new connection and have made it active. Now, let's change the hostname. To change the hostname, select the Set system hostname option, move to OK, and press Enter.

Change the hostname, select OK, and press the Enter key.

Press the Enter key to confirm the change. On the first screen, select the Quit option and press the Enter key.

To verify the changes, we can use the ip addr show [interface name] command. This command displays the specified device's current IP configuration.

To view the connections, we can use the nmcli con show command. This command lists all connections. If a connection is active on an interface, the output displays the interface's name in the device section.

We can use the hostname command to verify the hostname.

To delete a connection, open the nmtui utility, select the Edit a connection option, and press Enter.

Select the connection you want to delete, move to the Delete option, press the Enter key, Select the Delete option, and press the Enter key to confirm the delete operation.

Quit from the nmtui utility.

This tutorial is part of the tutorial series Managing Basic Networking (RHCSA / RHCE) Study Guide. Other parts of this series are the following.
Chapter 01 Managing Basic Networking RHCSA Exam
Chapter 02 Predictable Consistent Network Device Naming
Chapter 03 Linux ip Address Command Usages and Examples
Chapter 04 Linux ip Command Cheat Sheet
Chapter 05 The ip Command v/s the ifconfig Command
Chapter 06 Understanding Linux Network Manager Fundamental
Chapter 07 Managing Linux NetworkManager
Chapter 08 Linux NetworkManager Tools and Utilities
Chapter 09 The nmcli Command on Linux Examples and Usages
Chapter 10 The nmtui Command and Utility on Linux
Chapter 11 The nm-connection-editor Command on Linux
Chapter 12 How to Configure IP Address in Linux
Chapter 13 How to Configure Multiple IP Addresses on Linux
Chapter 14 How to Configure IPv6 on Linux
Chapter 15 Basic Linux Commands for Network Testing
Chapter 16 Network Configuration Files in Linux Explained
Chapter 17 The /etc/hosts, /etc/resolv.conf, and /etc/nsswitch.conf Files
Chapter 18 How to Change the Hostname on Linux
Key points
- The nmtui utility is part of the NetworkManager package.
- The NetworkManager provides the default network service on Linux.
- The NetworkManager offers three tools to manage NICs and connections. These tools are the nmcli, nmtui, and nm-connection-editor.
- The nmtui utility provides a curses-based application to manage connections. It does not need a GUI environment to run. You can run it on CLI.
Author Laxmi Goswami Updated on 2025-11-13