Configure VTP Server and Client in Switch
VTP (VLAN Tagging Protocol) is a Cisco proprietary VLAN management protocol. It allows you to manage VLAN dynamically. It works in three modes: Server, Transparent, and Client.
Based on the VTP mode you configure on a switch, it is called a VTP server switch, a VTP transparent switch, or a VTP client switch. For example, if you configure VTP Server mode on a switch, the switch is called a VTP server. Or if you configure VTP Client mode on a switch, the switch is called a VTP client switch.
You can add and remove VLANs on VTP server switches. The VTP server switches automatically propagate the VLAN information to all other switches. VTP client switches receive VLAN information from VTP servers. VTP transparent switches only pass VLAN information from VTP servers to VTP clients. They do not incorporate the VLAN information they pass through.
Setting up a Packet Tracer LAB
Create a practice lab on Packet Tracer, as shown in the following image.

VTP mode configuration commands
switch(config)#vtp domain [domain name]
switch(config)#vtp mode [server|client|transparent]
switch(config)#vtp password [password]
- The first command defines a domain name for the switch. Switches share VTP information only inside the domain. They ignore messages received from other domains.
- The second command defines the VTP mode of the switch. Server mode is the default VTP mode.
- The third command configures a password for the VTP domain. You must configure this password on all switches of the domain. Switches use it to authenticate VTP messages.
VTP configuration
Configure Switch0 and Switch2 as VTP servers, Switch3 and Switch4 as VTP clients, and Switch1 as a transparent switch.

VTP Server configuration on Switch0
Switch>enable
Switch#configure terminal
Switch(config)#vtp domain cisco
Switch(config)#vtp mode server
Switch(config)#vtp password password123
Switch(config)#

VTP Transparent configuration on Switch1
Switch>enable
Switch#configure terminal
Switch(config)#vtp domain cisco
Switch(config)#vtp mode transparent
Switch(config)#vtp password password123
Switch(config)#

VTP Server configuration on Switch2
Switch>enable
Switch#configure terminal
Switch(config)#vtp domain cisco
Switch(config)#vtp mode server
Switch(config)#vtp password password123
Switch(config)#

VTP Client configuration on Switch3
Switch>enable
Switch#configure terminal
Switch(config)#vtp domain cisco
Switch(config)#vtp mode client
Switch(config)#vtp password password123
Switch(config)#

VTP Client configuration on Switch4
Switch>enable
Switch#configure terminal
Switch(config)#vtp domain cisco
Switch(config)#vtp mode client
Switch(config)#vtp password password123
Switch(config)#

Trunk configuration
A switch port can work in two modes: access and trunk. In access mode, it works with a single VLAN. In trunk mode, it works with multiple VLANs. Access mode is the default mode on all switch ports. In a multi-VLAN environment, you need to change the default mode to trunk mode on all switch ports that connect switches.
Trunk configuration on Switch0
Switch(config)#interface gigabitethernet 0/1
Switch(config-if)#switchport mode trunk
Switch(config-if)#exit
Switch(config)#interface gigabitethernet 0/2
Switch(config-if)#switchport mode trunk
Switch(config-if)#

Trunk configuration on Switch1
Switch(config)#interface gigabitethernet 0/1
Switch(config-if)#switchport mode trunk
Switch(config-if)#exit
Switch(config)#interface gigabitethernet 0/2
Switch(config-if)#switchport mode trunk
Switch(config-if)#exit
Switch(config)#

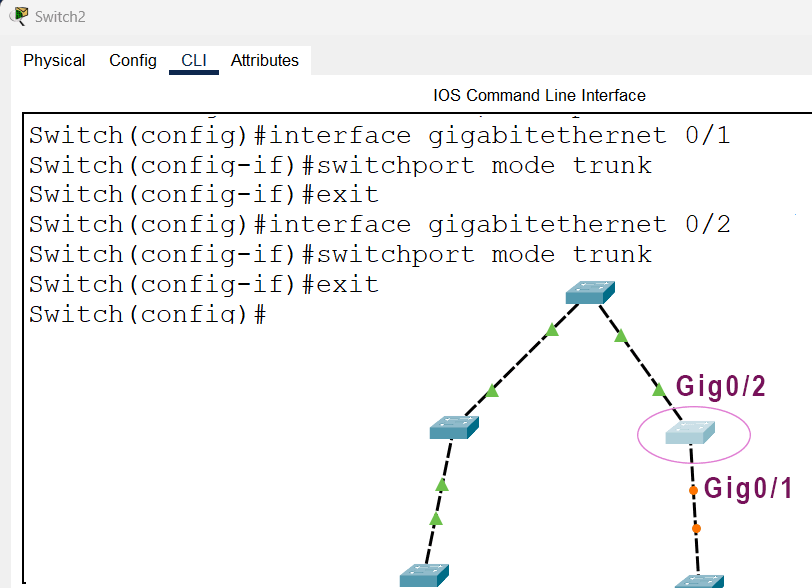
Trunk configuration on Switch2
Switch(config)#interface gigabitethernet 0/1
Switch(config-if)#switchport mode trunk
Switch(config-if)#exit
Switch(config)#interface gigabitethernet 0/2
Switch(config-if)#switchport mode trunk
Switch(config-if)#exit
Switch(config)#
Trunk configuration on Switch3
Switch(config)#interface gigabitethernet 0/2
Switch(config-if)#switchport mode trunk
Switch(config-if)#exit
Switch(config)#

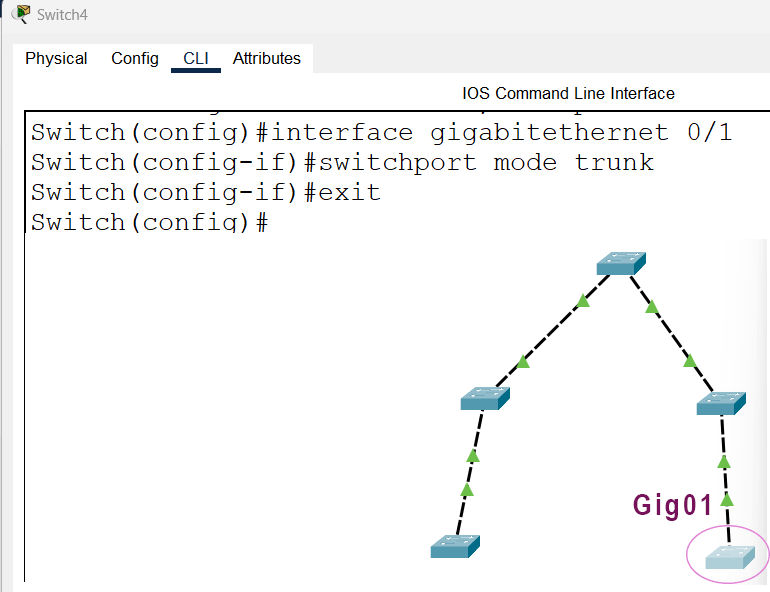
Trunk configuration on Switch4
Switch(config)#interface gigabitethernet 0/1
Switch(config-if)#switchport mode trunk
Switch(config-if)#exit
VLAN configuration
The vlan command creates VLANs. You need to create VLANs only on the VTP server. Other switches will automatically receive VLAN information from the VTP server. This network has two VTP servers. Create two VLANs on Switch0.
Switch(config)#vlan 10
Switch(config-vlan)#exit
Switch(config)#vlan 20
Switch(config-vlan)#exit
Switch(config)#

To view VLAN information, use the show vlan command in privileged exec mode. Run this command on Switch0 to verify the VLAN configuration.

Switch0 is a VTP Server. It will automatically propagate VLAN information to VTP clients. To verify this, you can check the VLAN configuration on VTP clients. Switch3 and Switch4 are VTP clients.

Updating VLAN information
You can update VLAN information on any VTP server in the VTP domain. For example, this network has two VTP servers: Switch0 and Switch2. You can update VLAN information on any of these. Create a new VLAN on Switch2.
Switch(config)#vlan 30
Switch(config-vlan)#exit

View VLAN information on Switch3 or Switch4 again to verify the update.

Verifying VTP transparent mode
In transparent mode, switches only pass VLAN information from VTP servers to VTP clients. They do not incorporate the VLAN information they pass through. To verify this, check the VLAN information on Switch1.
Switch#show vlan

Add one VLAN on Switch1.
Switch(config)#vlan 40
Switch(config-vlan)#exit

View the VLAN information again to verify the new VLAN.
Switch#show vlan

Since you created this VLAN on a transparent switch, it will not propagate to other switches. To verify this, view VLAN information on Switch3 or Switch4 again.
Viewing VTP password
The show vtp password command displays the configured VTP password on the switch.

Viewing VTP statistics
The show vtp counters command displays the VTP statistics.

Viewing VTP status
The show vtp status command displays the VTP status.

This tutorial is part of the tutorial VLAN, VTP, and DTP Concepts and Configurations on Cisco Routers.. Other parts of this tutorial are as follows:
Chapter 01 VLAN Basic Concepts Explained with Examples
Chapter 02 Advantages and Disadvantages of VLANs
Chapter 03 Static and Dynamic VLAN Membership Explained
Chapter 04 Access Link and Trunk Link Explained
Chapter 05 VLAN Tagging Explained with DTP Protocol
Chapter 06 DTP Modes and Protocol Explained
Chapter 07 802.1Q Native VLAN concept Explained
Chapter 08 Cisco Inter-Switch Link (ISL) Explained
Chapter 09 Trunk Tagging and Frame Tagging Explained
Chapter 10 VTP Modes and VTP Protocol Explained
Chapter 11 VTP Pruning on switches Explained
Chapter 12 VLAN Practice Lab Setup in Packet Tracer
Chapter 13 Configure VTP Server and Client in Switch
Chapter 14 VLAN Configuration Commands Step by Step Explained
Chapter 15 Router on Stick Configuration Explained
Conclusion
Managing VLANs across the network is a complex and tedious task. VTP protocol makes it easier. It dynamically manages VLAN information across the network. It allows you to add a new VLAN or remove an existing VLAN from a single switch. It automatically propagates the change in the entire network. This tutorial explained this process and the commands you need for it.
Author Laxmi Goswami Updated on 2026-04-20