Switchport Port Security Explained With Examples
By default, all switch ports operate in plug-and-play mode. This default behavior provides flexibility but at the cost of security. In an environment where all users are known to you, you can use a switch with the default configuration. However, using switches with the default configuration in an office or company environment increases the security risks. It allows users to change their locations on their own. In addition, it enables anyone to access unsecured network resources by simply connecting their device to any available switch port.
To block unauthorized access to switch ports, switches support a feature called port security. This feature allows you to configure which devices are allowed or blocked on each port. If you use this feature, the switch will allow only the authorized device to access the switch port. This tutorial explains how to configure, implement, and verify this feature.
Lab setup
Create a practice lab on Packet Tracer as shown in the following image. Packet Tracer is a network simulator software. It allows you to configure and test essential Cisco devices in a simulated environment.

Assign static IP configurations to both PCs.
| PC | IP address | Subnet mask |
| PC0 | 10.0.0.10 | 255.0.0.0 |
| PC1 | 10.0.0.20 | 255.0.0.0 |

Assign the IP address 10.0.0.100 and subnet mask 255.0.0.0 to Server0.

Access the switch's CLI prompt.

Viewing available port security commands
Port security works on an interface basis. You can secure each port individually. Enter interface configuration mode for the port you want to secure and run the following command.
switch(config-if)switchport port-security ?
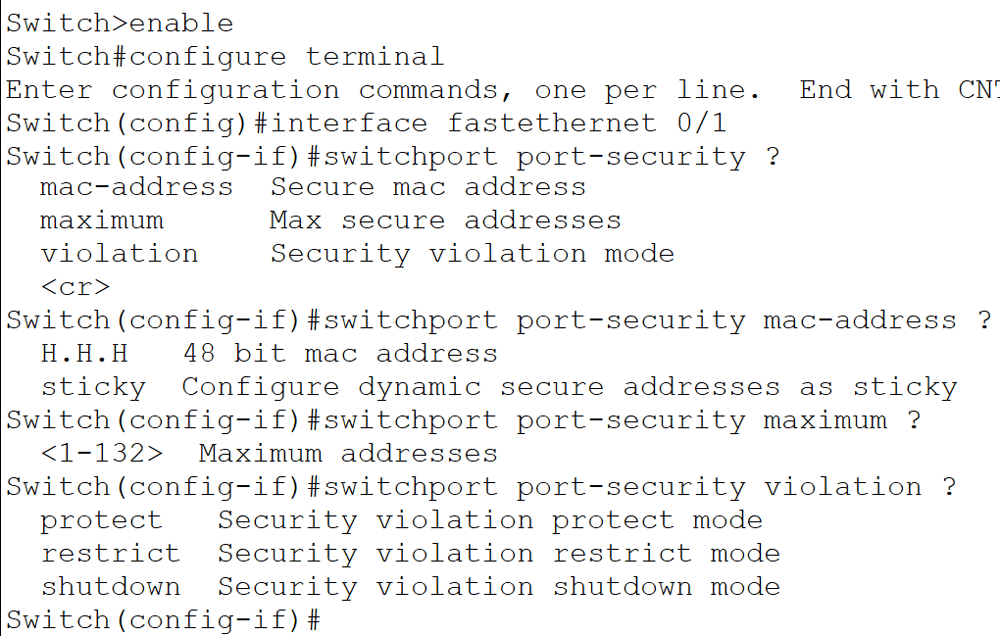
The above command lists all available options for this command.
Securing ports
The port security feature does not work on the following three types of ports.
- Trunk ports
- Ether channel ports
- Switch port analyzer ports
Port security works only on the access port. An access port connects an end device to the switch. By default, all switch ports work in access mode. If a port’s mode is set to other than the access mode, use the following command to set it to the access mode again.
switch(config-if)#switchport mode access
After changing the port type to access, run the following command to enable port security.
switch(config-if)#switchport port-security
After enabling port security, you need to tell the switch how many devices you want to attach to this port. The default is 1. You can attach a maximum of 132 devices to it. You can set this limit to any value between 1 and 132. Use the following command to set this value.
switch(config-if)#switchport port-security maximum [value]
Each end device has a unique MAC address. You can map this address to a switch port. After that, the port will allow incoming frames only from the mapped address. You have two options for mapping MAC addresses to switch ports: static and dynamic.
The static method is more secure than the dynamic method, but it requires more manual work. In this method, you manually map MAC addresses to switch ports using the following command.
switch(config-if)#switchport port-security mac-address [MAC Address]
In the dynamic method, you use the sticky feature. This feature enables an interface to learn the MAC addresses of connected devices automatically. The interface will learn MAC addresses until it reaches the maximum number of allowed hosts.
Access violation rules
Access violation rules specify the action the port takes when a violation occurs.
Protect:
This mode only works with the sticky option. In this mode, the port will drop frames from non-allowed addresses. It will not log dropped frames. The port will learn the address until it reaches the maximum allowed number. Any additional addresses learned would be dropped while keeping the interface operational.
Restrict:
In restrict mode, the port will drop frames from non-allowed addresses. However, in this mode, the switch logs an entry and generates a security violation alert.
Shutdown:
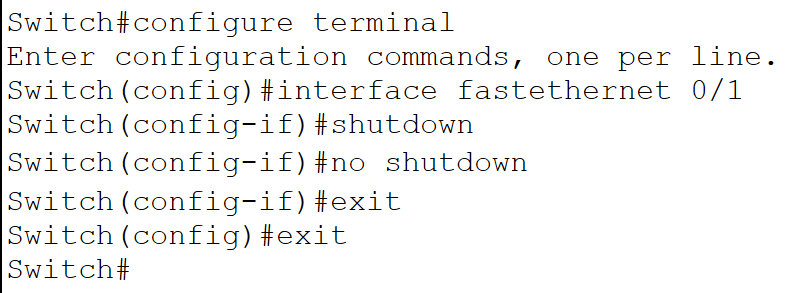
In this mode, the switch generates a violation alert and disables the port. The only way to re-enable the port is to enter the no shutdown command manually. This is the default violation mode.
Example
In this topology, PC0 is connected to F0/1. Enter the following commands to secure the F0/1 port.
Switch>enable
Switch#configure terminal
Switch(config)#interface fastethernet 0/1
Switch(config-if)#switchport mode access
Switch(config-if)#switchport port-security
Switch(config-if)#switchport port-security maximum 1
Switch(config-if)#switchport port-security violation shutdown
Switch(config-if)#switchport port-security mac-address sticky
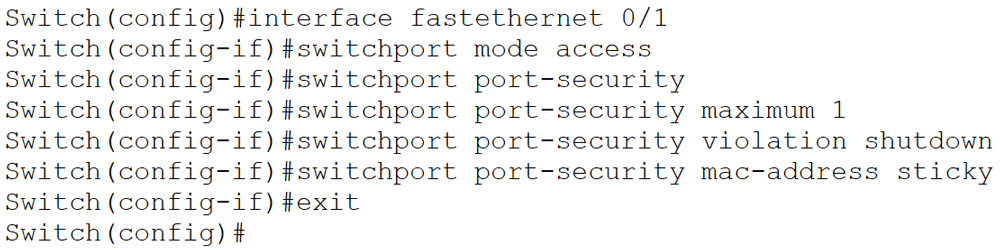
The following table explains the above commands.
| Command | Description |
| Switch>enable | Enter privilege exec mode |
| Switch#configure terminal | Enter global configuration mode |
| Switch(config)#interface fastethernet 0/1 | Enter interface configuration mode |
| Switch(config-if)#switchport mode access | Change the port mode to access port |
| Switch(config-if)#switchport port-security | Enable port security feature on this port |
| Switch(config-if)#switchport port-security maximum 1 | Set limit for hosts that can be associated with the interface. The default value is 1. Skip this command to use the default value. |
| Switch(config-if)#switchport port-security violation shutdown | Set security violation mode to shutdown. The default mode is shutdown. Skip this command to use the default mode. |
| Switch(config-if)#switchport port-security mac-address sticky | Enable the sticky feature. |
Unless you manually assign a MAC address to a port, the port uses dynamic mapping. In dynamic mapping, incoming frames' MAC addresses are automatically mapped to the MAC addresses of allowed devices. The above configuration allows one device on the F0/1 port. The F0/1 port will associate the first learned MAC address with the allowed device. To view the currently learned or mapped address, you can check the CAM table entries.
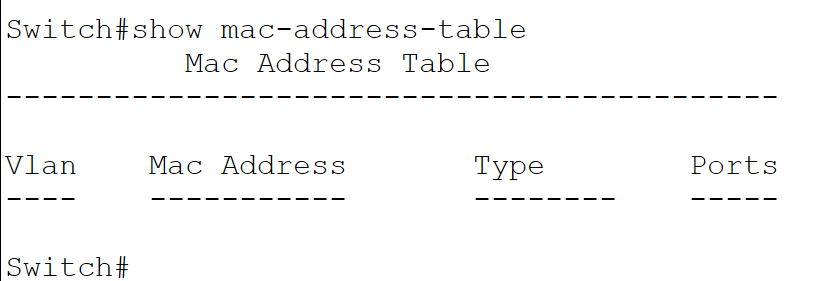
A switch learns MAC addresses from incoming frames. Since this switch has received no frames so far, the CAM table is empty. PC0 is connected to F0/1. Generate frames from PC0. The switch will receive these frames on F0/1.
Open a command prompt on PC0 and run the ping command to test connectivity to Server0. The ping command sends frames to Server0.

Check the CAM table on the switch again.
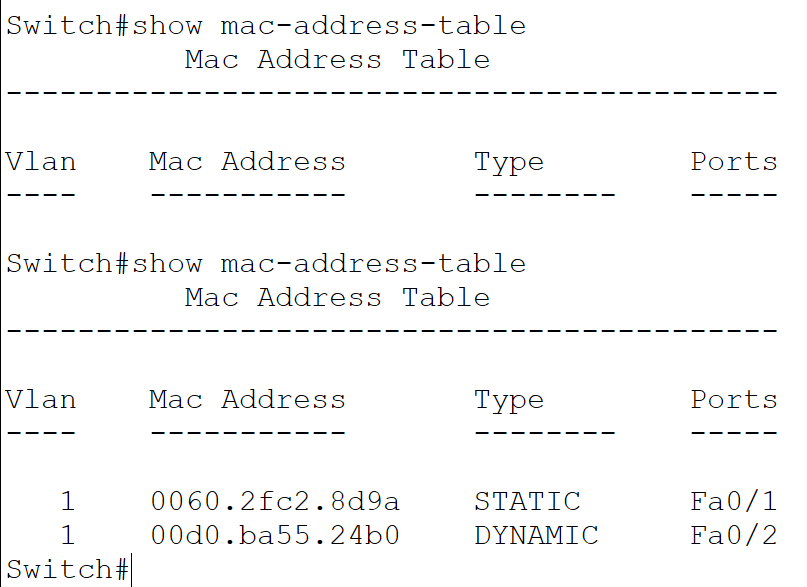
The switch learns PC0’s MAC address dynamically on F0/1 but shows its type as STATIC. This is because of the sticky option, which you used with the port security command. The sticky option automatically converts a dynamically learned address into a static address.
Switchport port security testing
This topology has one additional PC for testing. Let's suppose this PC belongs to an unauthorized person. He unplugged PC0 from the switch and attached his PC to F0/1. To simulate this scenario, remove the connection between PC0 and the switch’s F0/1 and create a new connection between PC1 and the switch’s F0/1 port.

Send the ping request from PC1 to Server0.

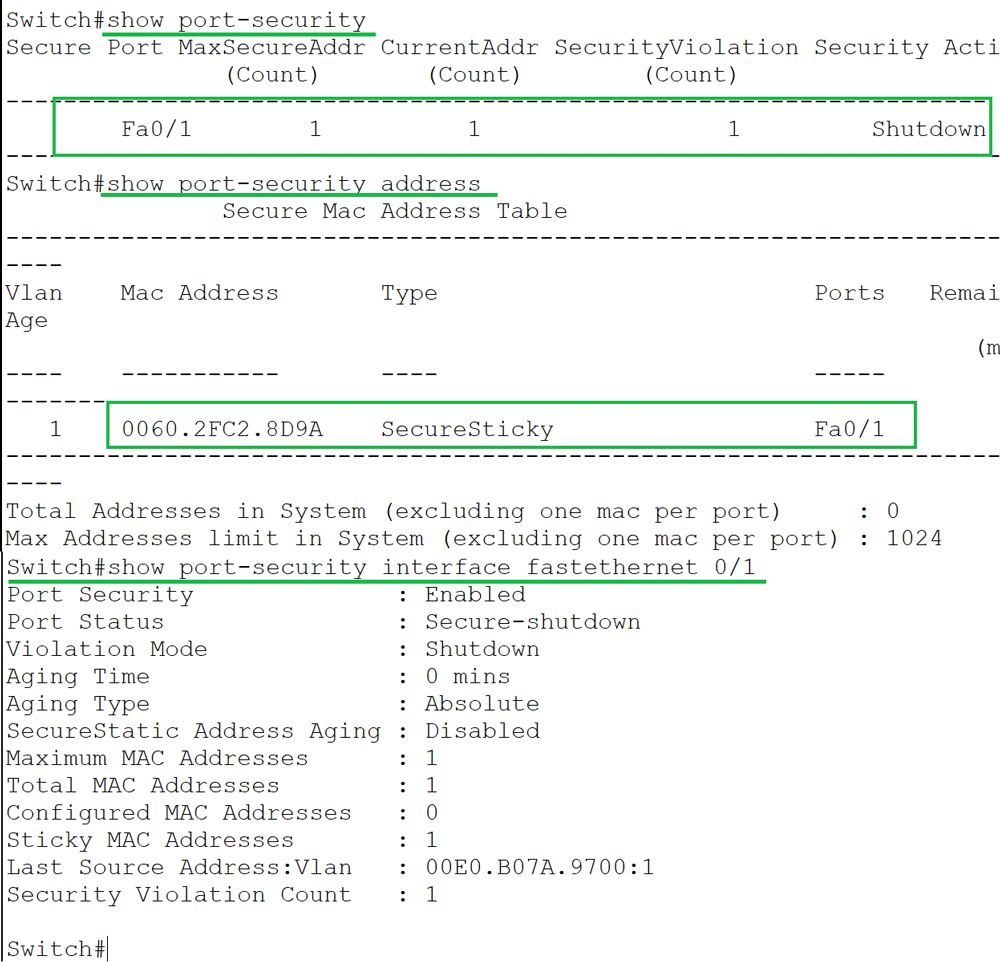
PC1 did not get a response from Server0. This is because when the F0/1 port receives frames from a new MAC address, it treats it as a violation and shuts down the port. You have three show commands to verify this.
| The show port-security command | This command displays port security information for all interfaces on the switch. |
| The show port-security address command | This command displays statically configured or dynamically learned addresses that are enabled for port security. |
| The show port-security interface [port] command | This command displays port security information about the specific port. |
Resetting a port
Once a port is shut down due to a security violation, the switch will not enable it automatically. You need to enable it again manually. To reset a port that is shut down due to a security violation, manually restart it from interface configuration mode.
Conclusion
Port security is an essential security feature on switches. This tutorial explained the commands and configuration steps you need to secure switch ports. Learning these commands and configuration steps allows you to secure your network from unauthorized access.
Author Laxmi Goswami Updated on 2026-08-04