Basic Switch Configuration Guide with Examples
A Cisco switch is different from a regular plug-and-play switch. It comes with an IOS. An IOS is a Cisco proprietary operating system. It allows you to configure, customize, and use Cisco devices as needed. It includes thousands of commands for various tasks. This tutorial explains essential commands for setting up a Cisco switch in a business environment.
Navigating IOS modes
Cisco IOS comes with different modes. Each mode has a distinct privilege and includes commands for specific purposes. The following table lists the necessary commands to navigate between different IOS modes with examples.
| Mode | Purpose | Prompt | Command to enter | Command to exit |
| User EXEC | Allows you to connect with remote devices, perform basic tests, temporarily change terminal settings, and list system information. | Switch> | Default mode after booting. Log in with a password, if configured. | Use the exit command. |
| Privilege EXEC | Allows you to set operating parameters. It also includes high-level testing and list commands like show, copy, and debug. | Switch# | Use the enable command from user exec mode. | Use the exit command. |
| Global configuration | Contains commands that affect the entire system. | Switch(config)# | Use the configure terminal command from privileged exec mode. | Use the exit command. |
| Interface configuration | Contains commands that modify the operation of an interface. | Switch(config-if)# | Use the interface [type] [number] command from global configuration mode. | Use the exit command to return to global configuration mode. |
| VLAN configuration | Contains commands that configure VLAN properties. | Switch(config-VLAN)# | Use the vlan [vlan-number] command from global configuration mode. | Use the exit command to return to global configuration mode. |
| Line configuration | Contains commands that configure the access line's properties. | Switch(config-Line)# | Use the line [type] [line-number] command from global configuration mode. | Use the exit command to return to global configuration mode. |

Getting help
Switch provides two types of context-sensitive help: word help and command syntax help.
Word help
Word help provides a list of all commands that begin with a specific letter. For example, to list all commands that start with the letter e, type e at the command prompt and press Enter. It will list all commands that begin with the letter e.
Switch#e?
enable  erase  exit
Switch#
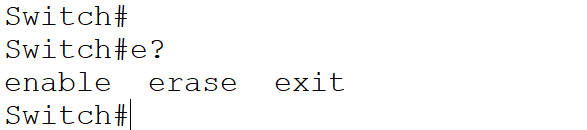
To list all commands available in a mode, type a question mark (?) and press Enter.

Command syntax help
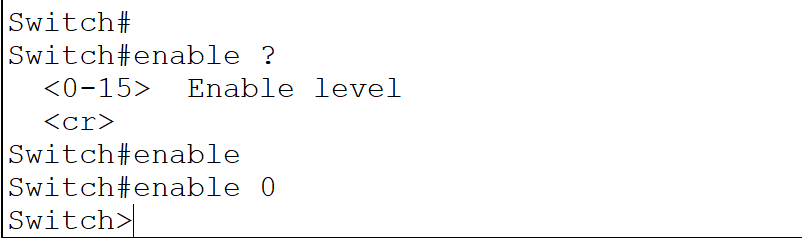
Command syntax help shows a list of all options, parameters, and arguments you can use with the typed command. Use the question mark (?) where you want help. For example, to see the parameters required by the enable command, type enable ? and the prompt will display all associated parameters. If the prompt returns <CR> as the only option, it means the command requires no additional parameters. You can execute the command as it is.
Switch#enable ?
<0-15>  Enable level
<cr>
Switch#enable
Switch#enable 0
Switch>
Setting up a hostname
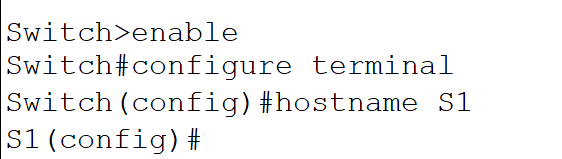
The default hostname is Switch. It does not provide any information about the device. To use a custom and descriptive name, use the hostname [desired hostname] command in global configuration mode. The following commands configure the hostname to S1. A hostname is locally significant. The new hostname applies immediately.
Switch>enable
Switch#configure terminal
Switch(config)#hostname S1
S1(config)#
Access lines
An access line allows you to connect an IOS running device. There are four types of access lines: console, auxiliary, TTYs, and VTYs. Modern devices do not have auxiliary ports. Only routers support TTYs. Consoles and VTY lines are available on all devices. Devices have only one console line. VTY lines depend on products.
Securing console line
To secure a console line, enter console line subconfiguration mode and set a password with the password command.
Switch(config)#line console 0
Switch(config-line)#password console_password
Use the following command to set the console line password to conCisco.
Switch(config)#line console 0
Switch(config-line)#password conCisco
Switch(config-line)#exit

Access lines and interfaces are numbered from 0 upward. The 0 in the first command represents the first console port. Since devices have only a console line, it denotes all lines. Passwords on IOS are case-sensitive. The password command sets the console password. When you run it under line console 0, it sets the User EXEC password for a user trying to access the IOS device from the console port only. It does not authenticate a user accessing the device from other supported lines. To prevent unauthorized access, you must set passwords on all supported lines.
Securing VTY lines
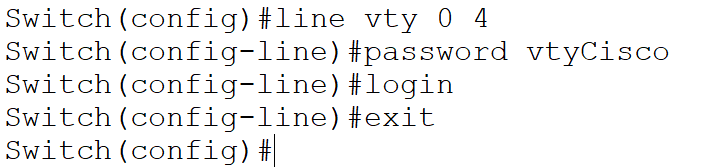
The VTY refers to a virtual terminal. It is a fancy name for telnet or SSH access. The number of supported VTY sessions depends on the model type. Switches track each connection separately using an incremental sequence number. For example, the 2960 switch supports up to 16 simultaneous VTY sessions, internally tracked by a number: 0–15. By default, a switch disables all VTY lines. You must enable them before use. The login command allows a VTY to log in. You can use a common password for all or multiple lines, or a separate password for each line. The following commands enable five virtual terminals and set the password to vtyCisco.
Switch(config)#line vty 0 4
Switch(config-line)#password vtyCisco
Switch(config-line)#login
Switch(config-line)#exit
Switch(config)#
Securing Privilege EXEC mode
Privilege EXEC mode is the entry point to access the configuration. You can secure this mode with a password. If you enable a password to access this mode, you must authenticate with the configured password mode. Besides User EXEC mode, you can access all modes only through Privilege EXEC mode. If you secure this mode with a password, it automatically protects all remaining modes.
Switch(config)#enable password Privilege_EXEC_password
or
Switch(config)#enable secret Privilege_EXEC_password
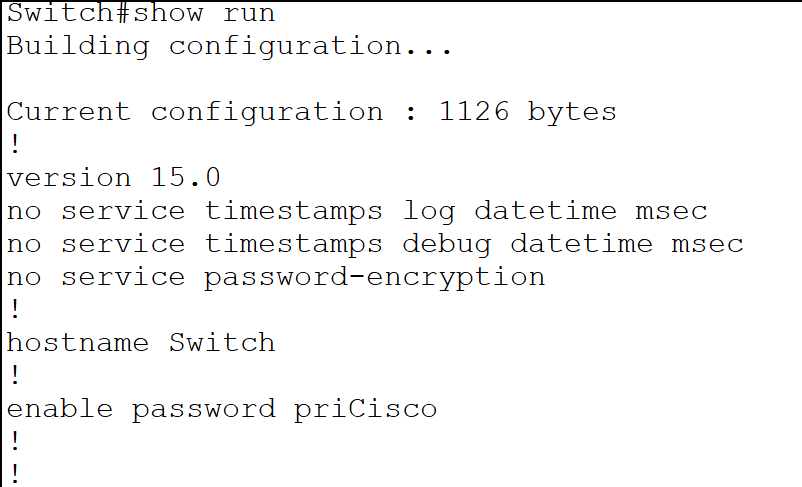
The main difference between the two is that the first command saves the password in plain text, while the second stores it in an encrypted format. The following commands configure and verify the Privilege EXEC mode password using the first method.
Switch(config)#enable password priCisco
Switch(config)#exit
Switch#
Switch#show run
Building configuration...
Current configuration : 1126 bytes
enable password priCisco
The following commands configure and verify the Privilege EXEC mode password using the second method.
Switch(config)#enable secret priCiscoEncrypt
Switch(config)#exit
Switch#
Switch#show run
Building configuration...

Current configuration : 1173 bytes
!
enable secret 5 $1$mERr$x7MweuLkTXdFc5w9bevR2/

Displaying login banners
You can set up a banner that displays whenever a user attempts to access User EXEC mode.
Switch(config)#banner motd [delimiting_character] banner [delimiting_character]
Switch(config)#
A delimiting character defines the starting and ending points of the message. You cannot use it in the banner. You can use the Enter key in a banner to create a multi-line banner.
Switch(config)#
Switch(config)#banner motd $ Banner before login $
Switch(config)#
Managing configuration
A switch maintains two configurations: running and startup. It saves the startup configuration in a file saved in NVRAM. It keeps the running configuration in RAM. When you start a switch, it reads the startup configuration and loads it into RAM as the running configuration. Any change you make to the running configuration, or any new configuration you add, remains in the running configuration until you manually save it to the startup configuration. If you restart the switch without saving the running configuration into the startup configuration, you will lose all changes you made.
Viewing the running configuration
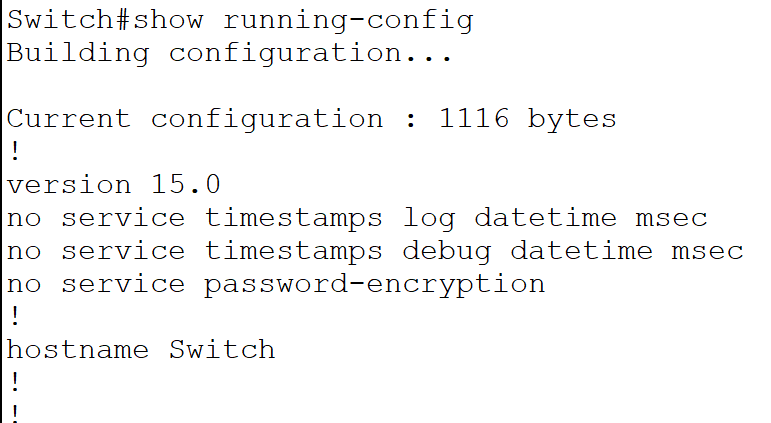
The following command shows the running configuration.
Switch#show running-config
Viewing the startup configuration
The following command shows the startup configuration.
Switch#show startup-config

Saving the configuration
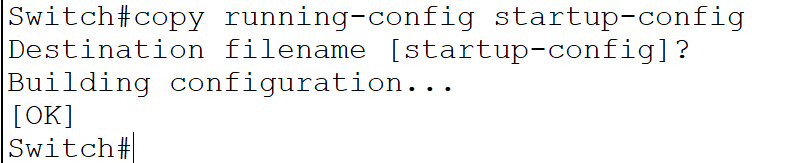
The following command saves the running configuration into the startup configuration.
Switch#copy running-config startup-config
Destination filename [startup-config]?
Building configuration...
[OK]
Switch#
Viewing device information
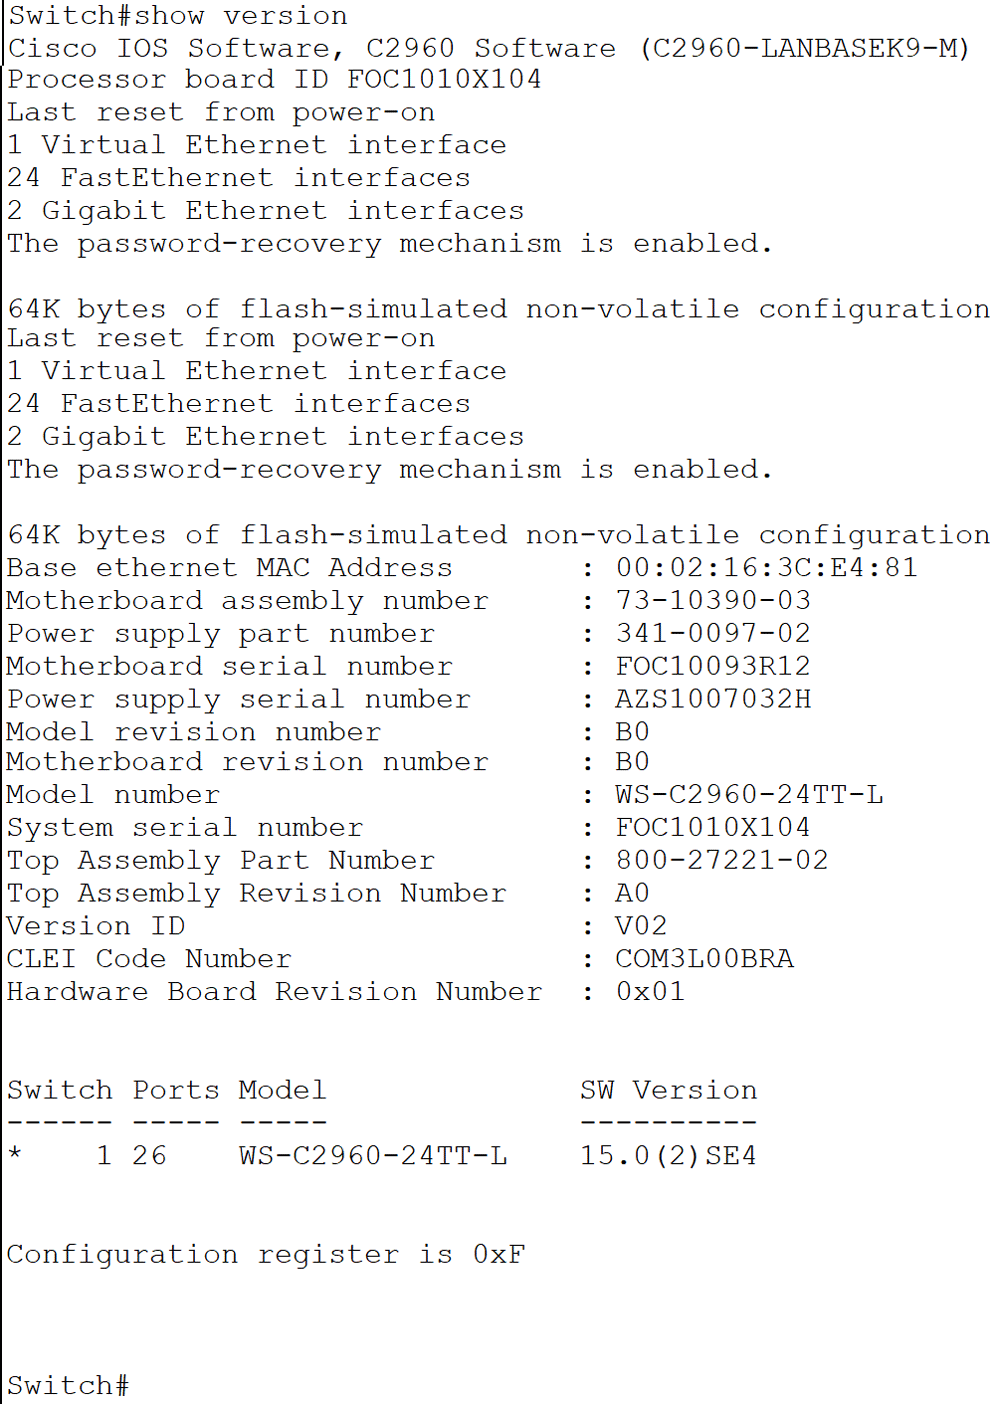
To view general information about the switch, such as model number, IOS file name, interface types, serial numbers, software version number, where the IOS is located and loaded, and its configuration file, as well as configuration settings, use the show version command.
Switch#show version
Viewing interface information
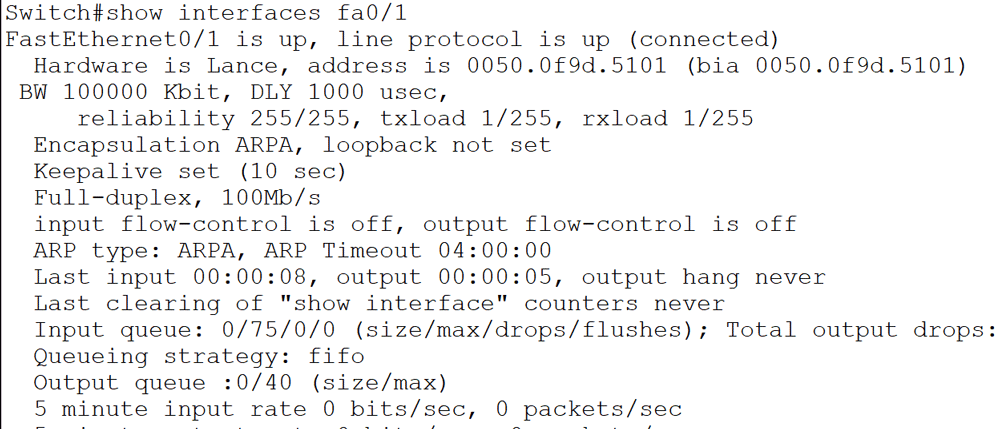
To view the status, statistical information, and configuration of an interface or all interfaces, use the show interfaces command. Specify an interface to view information about a specific interface.
Switch#show interfaces [type [slot_#/]port_#]
Skip the interface detail to display information about all interfaces.
Switch#show interfaces
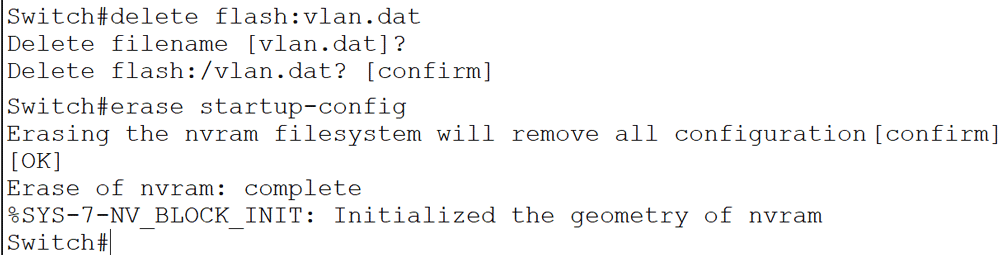
Resetting a switch to factory default
A factory reset removes all custom configuration and sets all settings to their default. To factory reset a switch, use the following commands.
Switch>enable
Switch#delete flash:vlan.dat
Delete filename [vlan.dat]?              [Press Enter Key]
Delete flash:vlan.dat? [confirm]         [Reconfirm by pressing the enter key]
Switch#erase startup-config
Switch#reload
Do not run the above commands on a production switch unless you clearly understand their effects.
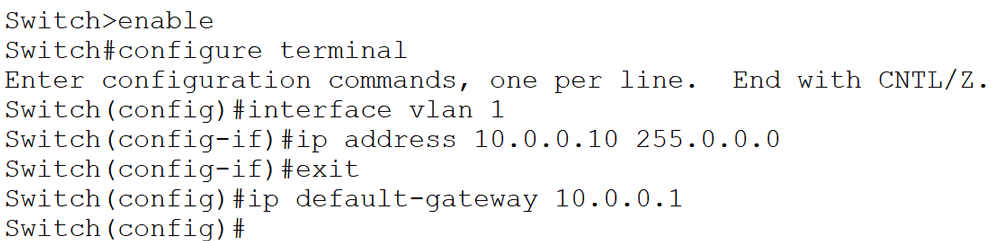
Assigning an IP configuration
An IP configuration enables you to manage a switch remotely via SSH and telnet. The following configuration assigns an IP configuration.
Switch(config)#interface vlan 1
Switch(config-vlan)# ip address [IP_address subnet_mask]
Switch(config-vlan)# exit
Switch(config)#ip default-gateway [router’s_IP_address]
A switch supports multiple VLAN. VLAN 1 is the default. It belongs to all interfaces. The ip address command assigns the address and subnet mask. The ip default-gateway command is necessary if the switch needs to communicate via IP with other devices in other subnets. The following configuration assigns the IP address 10.0.0.10/8 and the gateway IP address 10.0.0.1.
Switch>enable
Switch#configure terminal
Switch(config)#interface vlan 1
Switch(config-if)#ip address 10.0.0.10 255.0.0.0
Switch(config-if)#exit
Switch(config)#ip default-gateway 10.0.0.1
Switch(config)#
Interface description
A switch has several interfaces. Adding a description to an interface lets you identify its purpose or the device it connects to. The description command in the interface configuration mode adds it.
Switch(config)#interface fastethernet 0/1
Switch(config-if)#description Development VLAN

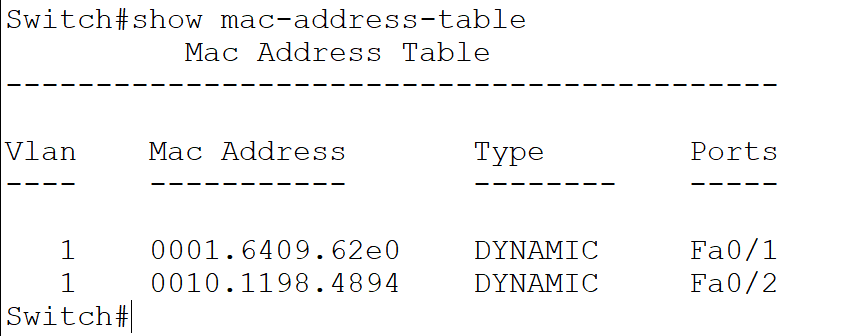
Clearing the MAC table
A switch saves all MAC addresses it learns in the MAC table. It dynamically manages this table. The following command shows its entries.
Switch#show mac-address-table
The following command clears the MAC table.
Switch#clear mac-address-table

Managing port mode
A switchport can work in two modes: half and full. In the half-duplex mode, it can either send or receive data at a time. In the full-duplex mode, it can send and receive data simultaneously. A switch automatically adjusts port mode depending on the remote device. However, you can force the switch to operate in a particular mode. The duplex command sets the port's duplex mode.
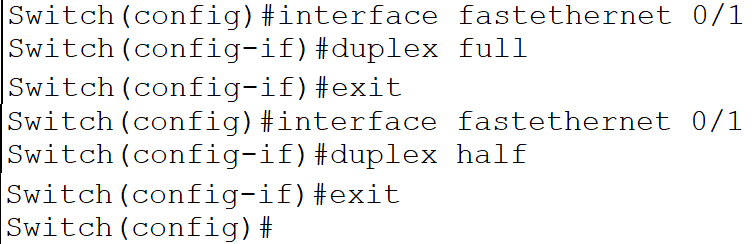
The following commands set the fastethernet0/1 interface to full duplex.
Switch(config)#interface fastethernet 0/1
Switch(config-if)#duplex full
The following commands set the fastethernet0/1 interface to half duplex.
Switch(config)#interface fastethernet 0/1
Switch(config-if)#duplex half
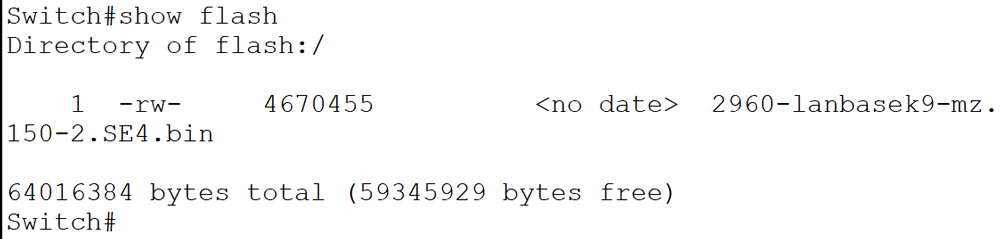
Viewing flash content
Switch stores the IOS image file in the flash memory. The show flash command lists the contents of the flash memory.
Switch#show flash
Conclusion
Configuring a Cisco switch is complex and requires a vital skill. This tutorial explained the essential switch configuration commands. With these fundamental configuration commands, you can manage a Cisco switch effectively in any networking scenario.
Author Laxmi Goswami Updated on 2025-11-25