How to install Ubuntu Linux from USB Pen Drive
Ubuntu packs installation files in an archived package. This package is formatted and distributed as an ISO image file. You can download this ISO image file from the following webpage.
https://www.ubuntu.com/download
Since installation files are compressed and packaged in the ISO image file, we cannot use them directly for the installation.
Preparing Ubuntu installation disk from the ISO image file
Ubuntu prepares the IOS image file for a DVD. If you want to use a DVD as the installation medium, you can directly burn the IOS image file on the DVD. For this, you can use any free and open-source ISO burner software. The ISO burning software automatically extracts installation files from the ISO image and burns them in the DVD. Sometimes, it is not possible to use a DVD for installation. For example, the target system does not have a DVD drive, or you do not have a blank DVD to burn the downloaded ISO image file. In that case, you can use a USB/Pen drive.
If you want to use a USB/Pen drive to make the installation disk, you must prepare it differently. Just like we burn the ISO image to DVD, we cannot burn the ISO image to a USB/Pen drive. Besides this, if we directly extract an ISO image file in the USB drive, it also does not work. It does not place boot files in the necessary place. To make a USB drive bootable, we must create an MBR and place boot files on it. We must format the USB drive with the file system that Linux understands. Luckily, you do not need to perform any of these actions manually. Similar to ISO burning software, many USB burner software also exist. You can use any USB burner software that makes the USB drive bootable and burns the ISO image.
Rufus
Rufus is free and open-source software. It not only makes the USB drive bootable but also extracts the contents of the ISO image file. It is available in two variations: installer and portable. The only difference between both variations is that the installer variation permanently installs the Rufus on the system.
You can download the Rufus from the following webpage.
https://rufus.ie/

This software is currently available only for the Windows platform. You can use this software on any Windows version, such as Windows 10 and 11.
Creating Ubuntu bootable installation USB/Pen drive
Download the Ubuntu installation ISO image file and Rufus USB burner software from their official web pages.

After downloading both files, attach a USB drive with the system and launch the Rufus. On starting, it takes confirmation to check updates online. If you want to update the Rufus before creating the Ubuntu bootable USB drive, click the Yes button.
Click the No button to start Rufus.

The Rufus starts as a standalone application. It detects all attached USB drives and lists them under the option Device. Select the USB drive which you want to use for this process.

Click the Select button, and select the downloaded ISO image file.

Leave the remaining options as they are and click the Start button.

Rufus starts the process. It reads the files that make the drive bootable from the ISO image. If the internet connection is available, it also checks the latest version of these files online. If it finds a newer version of any of these files, it prompts us to download them.
If prompted, click the Yes button to confirm the downloading.
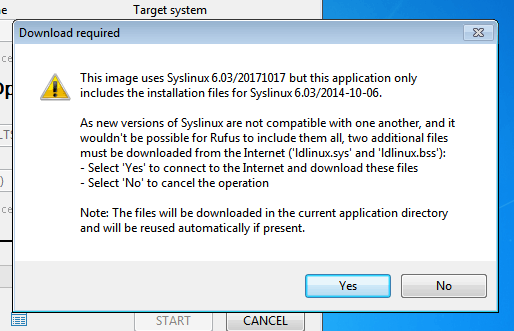
Upon confirmation, it downloads and uses the latest version of that file.

After reading, downloading (if required), and verifying the necessary boot files, it checks the selected ISO image file. Based on the type of ISO image, it can run in two modes: ISO Image mode and DD Image mode.
ISO Image mode: - This mode allows us to utilize the remaining space. You can use the remaining space to store additional data or application software.
DD Image mode: - This mode does not allow you to use the remaining space to store the additional data.
Let’s take an example. We use an 8GB USB drive for this purpose. After making it a bootable installation drive, 5GB remains free. If we use the ISO image mode, we can use this space. If we use the DD Image mode, we can not use this space.
Select the desired mode and click the OK button.

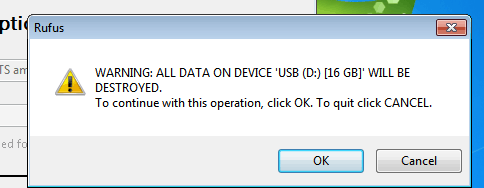
Rufus formats the USB drive and creates the supported file system on it. Click the OK button to confirm the action.
That’s all the information and confirmation Rufus needs before starting the process. Now, it performs all necessary steps and actions. It displays real-time updates in the Status section.

The Ready message in the status section confirms the drive is ready to use. Click the Close button to close the Rufus.

Remove the USB/Pen drive from the system. Now, you can use this drive to install the Ubuntu.
Installing Ubuntu from the USB/Pen drive
Attach the Ubuntu bootable USB/Pen drive and start the system. When the system starts, press the Esc key on the first screen to open the boot menu.

Set the Removable Devices as the first boot device.

Setting the first boot device to Removable Devices forces the startup process to boot the system from the removable devices instead of the hard disk. The system boots from the Ubuntu bootable USB drive and starts the installation. The following image shows the first screen of the installation process.

Ubuntu installation involves many steps and options. Due to the length of this tutorial, I separately explained these steps in the following tutorial.
Installing Ubuntu on VirtualBox
Conclusion
Installing Ubuntu from a USB drive provides an alternative to the default installation methods. Many devices, such as notebooks and entry-level laptops, do not have a DVD-ROM. In that case, this option provides a simple solution for the installation.
By ComputerNetworkingNotes Updated on 2026-05-08