IPv4 Troubleshooting Guide: Ping, APIPA, Subnet Mask, Gateway & NAT
Network connectivity problems are among the most common challenges network administrators and IT support professionals face. A user might report that they cannot access the internet, connect to a shared folder, or communicate with another device on the network. If you've ever found yourself in such a situation, you are in the right place. In this tutorial, I will explain a highly structured, evidence-based approach to isolate and identify exactly where network communication is breaking down.
The following CCNA 2.0 exam objectives are addressed in this tutorial.
1.0 Network Infrastructure and Connectivity
1.3 Troubleshoot IPv4 address configuration, assignment, and subnetting (public and private)
In this guide, we will explore five essential areas of IPv4 troubleshooting:
- Testing connectivity using the four-step ping method.
- Identifying DHCP failures using APIPA addresses.
- Understanding subnet masks and local-versus-remote communication.
- Verifying the default gateway configuration.
- Troubleshooting NAT and PAT on Cisco routers.
Let's explore each step in detail.
The Four-Step Ping Method
The first rule of network troubleshooting is simple: Always begin with the host device. Before investigating routers, switches, or firewalls, verify that the local computer's networking components are functioning correctly. A systematic ping test helps isolate connectivity problems by moving progressively from the local TCP/IP stack to remote network destinations.

Step 1: Ping the Loopback Address (127.0.0.1)
Open the command prompt and execute:
ping 127.0.0.1
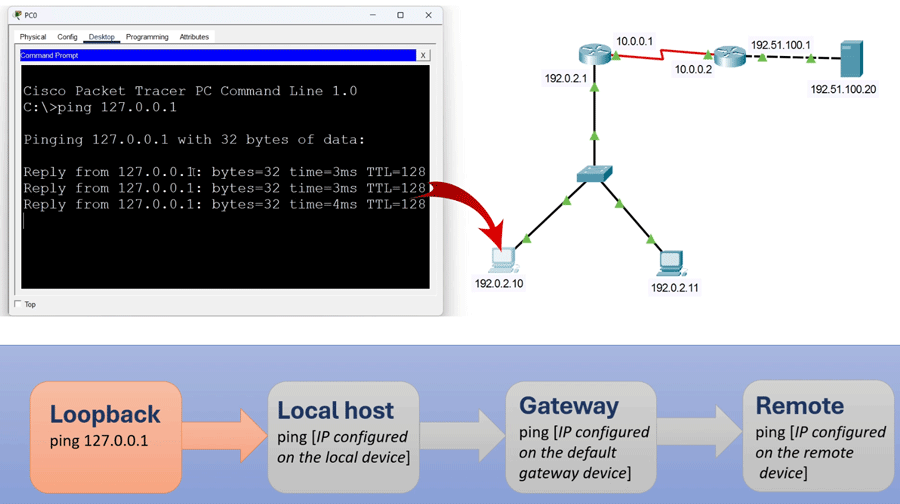
The loopback address is a special IPv4 address used by a computer to communicate with itself. A successful response confirms that the local TCP/IP stack is functioning and processing loopback traffic correctly. If this test fails, the problem may involve the operating system's TCP/IP implementation or local network configuration.
Step 2: Ping the Local IP Address
Next, ping the IP address assigned to the computer's network interface card (NIC).
ping [your-local-IP-address]
For example:
ping 192.0.2.10
This test verifies that the host can communicate with its own configured interface address.

If the loopback test succeeds but this test fails, investigate the network interface configuration, driver, or local IP binding.
Step 3: Ping the Default Gateway
The third step is to test communication with the default gateway.
ping [default-gateway-IP]
For example:
ping 192.0.2.1

The default gateway is generally the router interface responsible for forwarding traffic outside the local subnet. A successful response indicates that the host can communicate with its local gateway. If this test fails, investigate:
- Incorrect IP address configuration.
- Incorrect subnet mask.
- Incorrect gateway address.
- Physical connectivity problems.
- VLAN configuration issues.
- Switch port security or access restrictions.
- Router interface status.
Remember that some devices may block ICMP requests, so a failed ping alone does not always prove that the gateway is unreachable.
Step 4: Ping a Remote Device
Finally, test connectivity to a device outside the local subnet.
ping [remote-IP-address]
For example:
ping 192.51.100.20
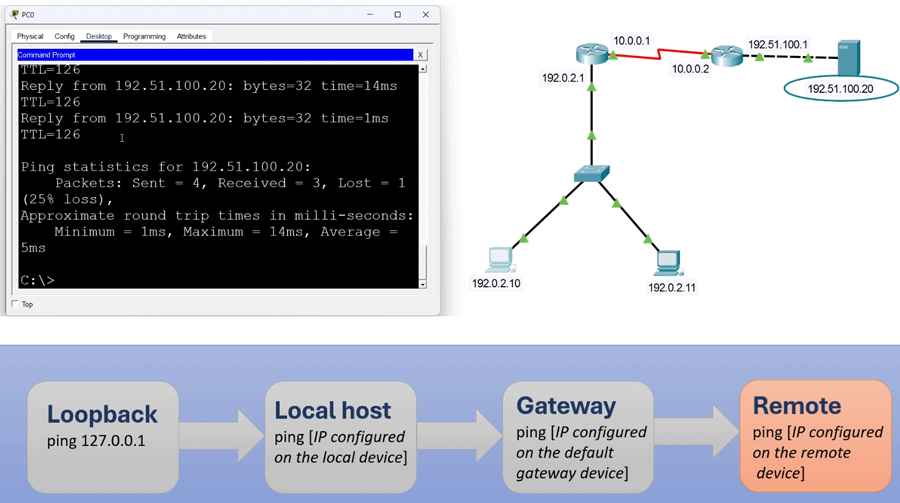
If the first three tests succeed but this test fails, the problem may involve:
- Routing configuration.
- Firewall restrictions.
- NAT configuration.
- ISP connectivity.
- Remote destination availability.
Why is this sequence important?
Imagine spending three hours examining firewall access control lists and complex routing configurations, only to discover that the user's computer does not have a valid IP address. A systematic troubleshooting sequence prevents unnecessary configuration changes and helps identify the actual location of the fault.
2. APIPA: Understanding Automatic Private IP Addressing
What happens when a computer requests an IP address from a DHCP server but receives no response? Modern operating systems support a fallback mechanism called APIPA (Automatic Private IP Addressing). APIPA allows a host to automatically assign itself an IPv4 address when a DHCP server cannot provide one.
How Does APIPA Work?
When a computer starts, it normally sends a DHCP request to obtain its IP address, subnet mask, default gateway, and other network configuration details. If the DHCP server does not respond, the computer can assign itself an address from the following range:
169.254.0.0/16
The usable APIPA address range is:
Starting address:    169.254.1.0
Ending address:      169.254.254.255
Subnet mask:         255.255.0.0
This allows devices on the same local network segment to communicate with each other, provided their network conditions permit it. However, APIPA does not automatically configure a default gateway. As a result, a device using an APIPA address cannot communicate with devices on other IP subnets through normal IPv4 routing.
How to Identify an APIPA Address
Open Command Prompt and execute:
ipconfig
Look for an IPv4 address beginning with:
169.254.x.x
For example:
IPv4 Address . . . . . : 169.254.25.10
Subnet Mask  . . . . . : 255.255.0.0
Default Gateway . .  . :
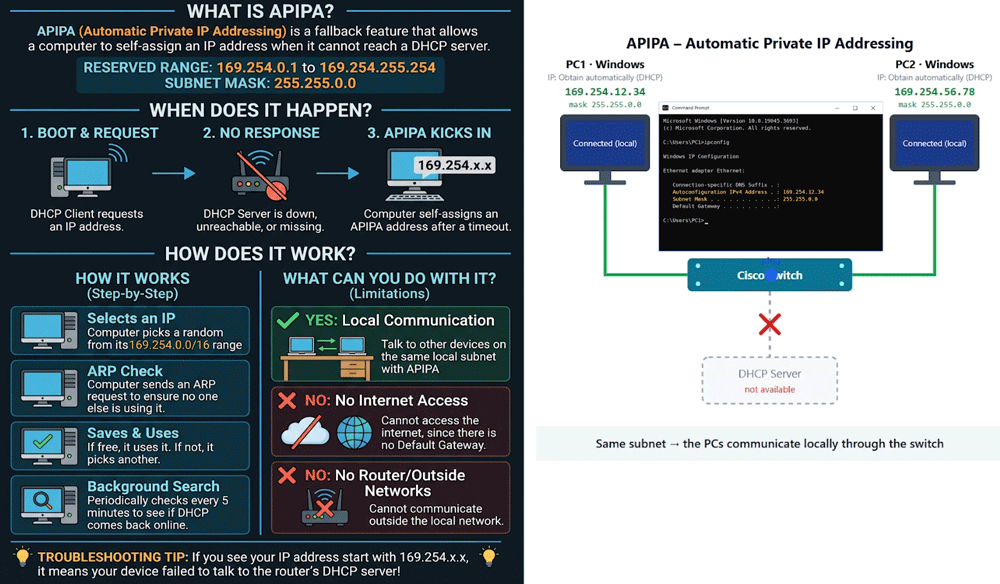
Important diagnostic clue
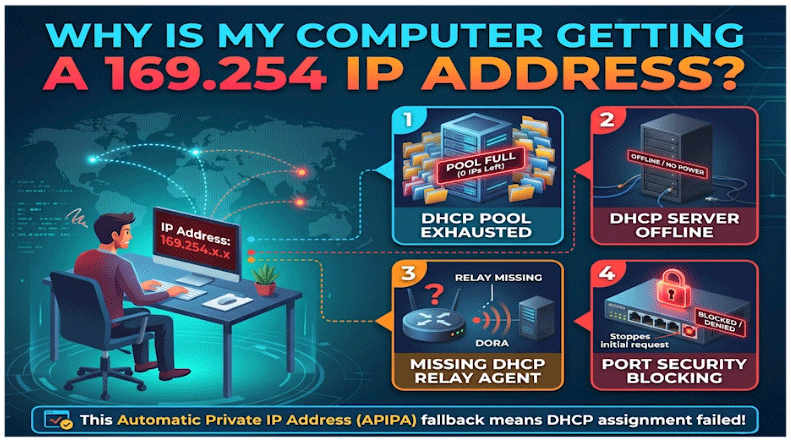
If you discover an IP address in the 169.254.x.x range, investigate DHCP assignment before troubleshooting routing. Several problems can prevent a computer from obtaining an address from DHCP:
- DHCP server failure: The DHCP server may be offline or unreachable.
- DHCP scope exhaustion: The available address pool may have no free addresses.
- Missing DHCP relay agent: A router may not have the required DHCP relay configuration to forward requests between subnets.
- Switch port security: Security restrictions may block DHCP traffic.
- VLAN configuration problems: The client may be connected to the wrong VLAN.
- Physical connectivity issues: A disconnected cable or faulty network interface may prevent communication.
How to Troubleshoot APIPA
Start by checking the current IP configuration:
ipconfig /all
Then attempt to obtain a new DHCP lease:
ipconfig /release
ipconfig /renew
If the problem continues, investigate DHCP server availability, scope configuration, VLAN assignments, and DHCP relay settings. The key lesson is that an APIPA address usually indicates an IP assignment problem, not a routing problem.
3. Subnet Masks: Understanding Local and Remote Communication
Having a valid IP address does not necessarily mean that a device is configured correctly. The subnet mask plays a critical role in determining whether a destination belongs to the local network or a remote network. A subnet mask tells a computer which portion of an IP address represents the network and which portion represents the host.
How Subnet Masks Affect Communication
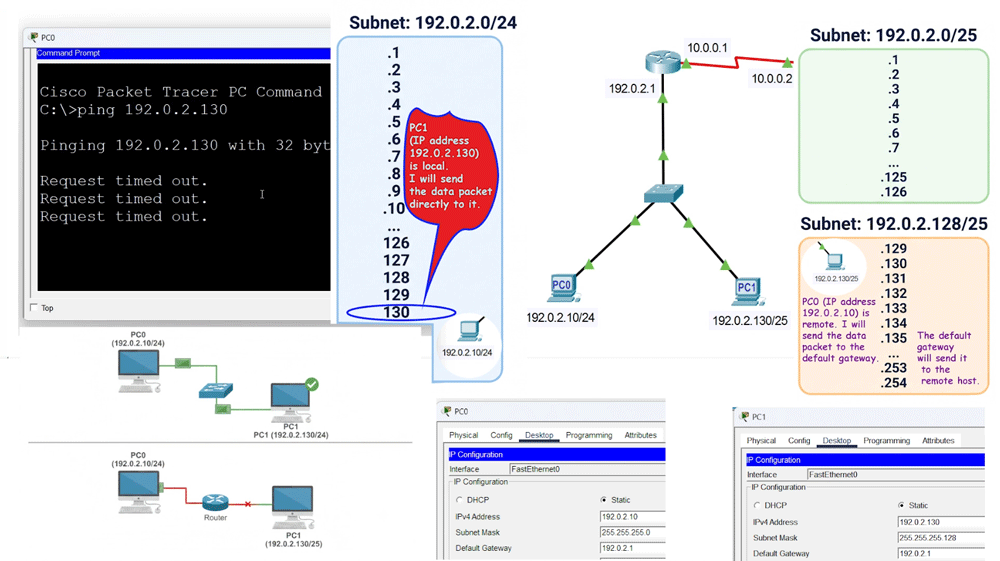
Consider two computers connected to the same physical network.
| Device | IP address | Subnet mask | Subnet mask in slash notation |
| Host A | 192.0.2.10 | 255.255.255.0 | (/24) |
| Host B | 192.0.2.20 | 255.255.255.128 | (/25) |
- Host A uses a /24 subnet mask and considers the entire 192.0.2.0/24 network local.
- Host B uses a /25 subnet mask and considers only 192.0.2.0/25 local.
- This creates an asymmetric communication problem.
The result can be confusing connectivity problems, dropped TCP handshakes, and unexpected packet flows.
An Easy Way to Remember IP Addresses and Subnet Masks
Think of an IP address as a house number and the subnet mask as a postal ZIP code.
- If two houses belong to the same local area, they can communicate directly.
- If a house belongs to another area, the message must travel through the postal system, represented by the router.
The subnet mask determines whether the computer should send traffic directly to another device or forward it through the default gateway.
Why Is Subnet Mask Verification Important?
An incorrectly configured subnet mask can cause two major problems:
- Subnet mask too broad: The host may incorrectly consider remote destinations local and attempt ARP resolution instead of using its gateway.
- Subnet mask too narrow: The host may incorrectly consider local devices remote and send their traffic to the default gateway.
Therefore, always verify the IP address and subnet mask together.
4. Default Gateway: Checking the Exit Door of the Network
Once the host's IP address and subnet mask are verified, the next step is to investigate the default gateway. The default gateway is the router interface that allows devices to communicate with destinations outside their local subnet.
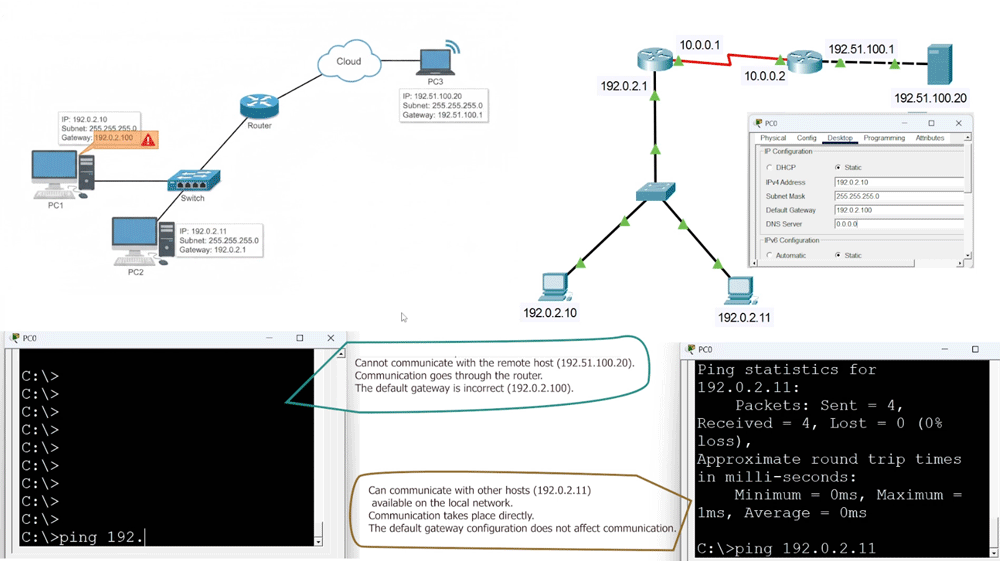
Understanding the Default Gateway
Consider a common help desk complaint:
"I can access the internal file server and communicate with my colleagues, but I cannot access the internet."
This situation provides an important diagnostic clue. If local network communication works but communication with remote networks fails, the default gateway should be one of the first things you investigate.
How Does a Host Decide Whether to Use the Gateway?
Before forwarding a packet, the host performs a mathematical operation using its own IP address and subnet mask. This operation is called a bitwise AND operation.
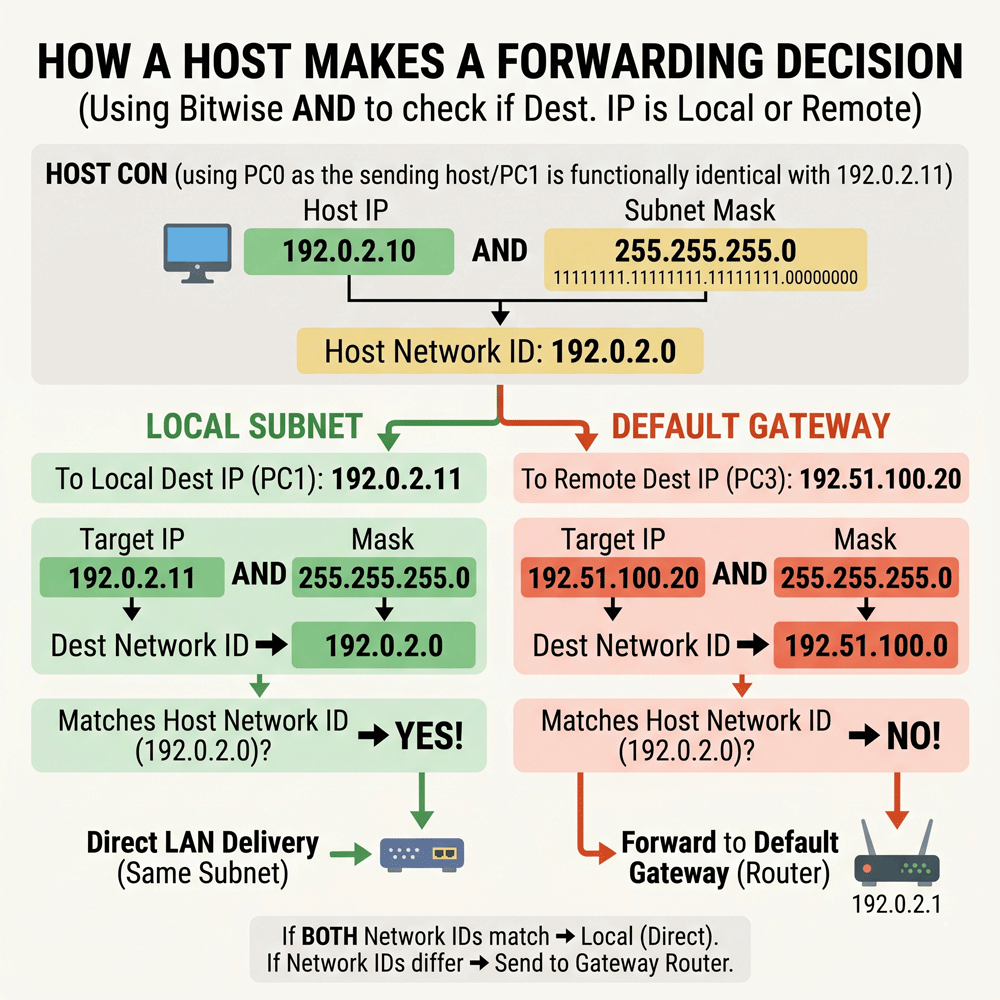
The host calculates its network address and compares it with the destination address.
- If the destination belongs to the same subnet, the host attempts direct communication using ARP.
- If the destination belongs to a different subnet, the host forwards the packet to its configured default gateway.
Why Must the Default Gateway Be in the Local Subnet?
A host must be able to reach its default gateway through its local network. Consider this example:
Parameter              Configuration
Host IP address        192.0.2.10
Subnet mask	       255.255.255.0
Correct gateway	       192.0.2.1
In this configuration, the host belongs to the 192.0.2.0/24 network, and the gateway address 192.0.2.1 is within the same subnet. Now imagine that the gateway is mistakenly configured as:
Parameter	       Configuration
Host IP address	       192.0.2.10
Subnet mask	       255.255.255.0
Correct gateway	       192.0.3.1
The host considers this address remote and cannot use it as its directly reachable next-hop gateway under normal IPv4 host configuration. As a result, communication outside the local network fails.
How to Verify the Default Gateway
On a Windows computer, execute:
ipconfig /all
Check the Default Gateway entry. Then test connectivity:
ping 192.0.2.1
Replace the example address(192.0.2.1) with the actual gateway configured on your network. Also verify that:
- The gateway IP matches the router's LAN interface.
- The router interface is operational.
- The host and gateway belong to the same subnet.
- The switch VLAN configuration is correct.
- No access restrictions are blocking communication.
- A simple gateway configuration error can completely interrupt internet connectivity even when local communication works perfectly.
5. Verifying NAT and PAT on Cisco Routers
After verifying the host's IP configuration, subnet mask, and default gateway, the next step is to investigate Network Address Translation (NAT). A packet may successfully reach the boundary router but still fail to access the public internet if NAT is incorrectly configured. This is particularly important because private IPv4 addresses are not globally routable across the public internet.
What Is NAT?
Network Address Translation (NAT) allows private IP addresses to be translated into public IP addresses. For example, an internal computer might use:
192.168.1.10
However, when communicating with an internet server, the router may translate this private address into a public IP address assigned by the ISP.

Cisco networking terminology uses two important terms:
- Inside Local: The private IP address assigned to an internal host.
- Inside Global: The public IP address representing that internal host to the outside network.
Other NAT terminology includes Outside Local and Outside Global, which describe how external destination addresses are represented from the inside and outside perspectives.
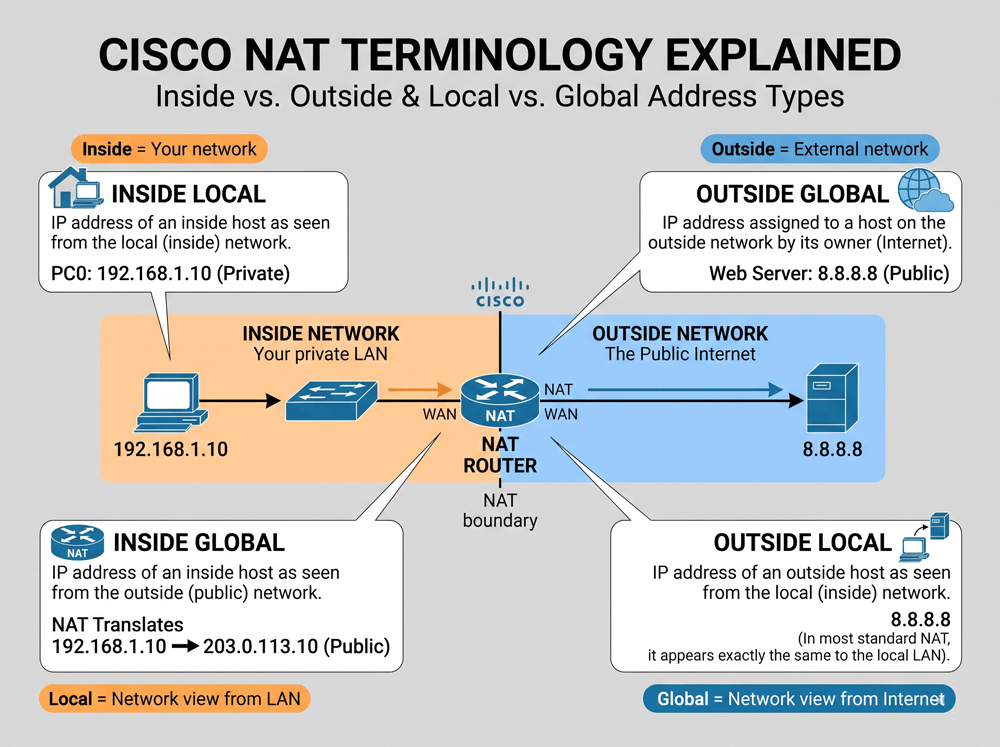
Understanding Static and Dynamic NAT
There are different methods of NAT implementation.
Static NAT
Static NAT establishes a fixed one-to-one mapping between an inside local address and an inside global address. For example:
Inside Local        	Inside Global
192.168.1.10        	203.0.113.10
This mapping remains consistent. Static NAT is useful when an internal server needs to be reachable through a dedicated public IP address.
Dynamic NAT
Dynamic NAT assigns public IP addresses from a configured pool. When an internal device initiates communication, the router selects an available public address from that pool. The mapping is temporary and generally removed when its translation entry expires.
What Is PAT (Port Address Translation)?
Most organizations do not have enough public IPv4 addresses to assign one public address to every internal device. This is where Port Address Translation (PAT), also called NAT Overload, becomes useful. PAT allows multiple internal devices to share a single public IP address. Instead of relying only on IP addresses, the router also uses TCP or UDP port numbers to distinguish individual sessions.

How to Verify NAT Translations on Cisco Routers
Display the NAT translation table
show ip nat translations
This command displays active NAT translation entries.
Display NAT statistics
show ip nat statistics
This command provides information about NAT configuration, translation counts, and interface assignments.
Check NAT configuration
show running-config
Look for NAT-related access control lists, translation rules, and inside/outside interface assignments.
Common NAT and PAT Troubleshooting Checklist
If NAT translations are missing or traffic is not being translated correctly, investigate the following areas.
- Check the Dynamic NAT Pool
Verify that the configured public IP address pool contains sufficient available addresses. - Check for Overlapping NAT Pools Ensure that multiple NAT rules are not competing for the same address ranges.
- Verify Static NAT Mappings
Check whether static mappings conflict with dynamic NAT pools. - Verify Access Control Lists (ACLs)
Ensure that the NAT access control list correctly identifies the internal networks that should be translated. - Verify Inside and Outside Interfaces
The router interfaces must be correctly identified for NAT processing.
If the problem persists, use the diagnostic command:
debug ip nat
This command displays real-time information about NAT translation activity. It can help identify whether packets are being translated successfully or whether they are failing to match the expected translation rules.
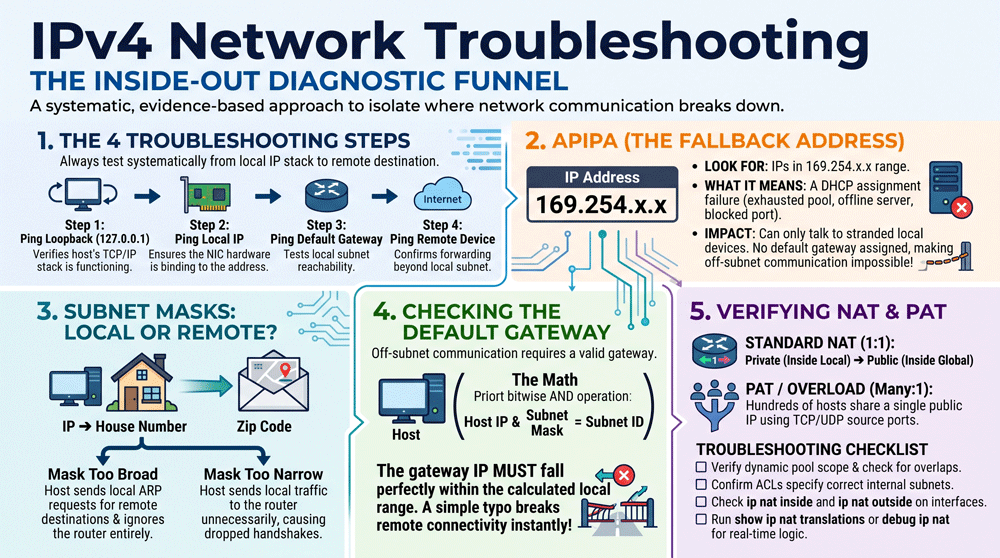
The Inside-Out IPv4 Troubleshooting Method: Quick Reference
The most important lesson from this guide is to troubleshoot network connectivity systematically rather than guessing. The following table summarizes the complete diagnostic process.
| Step | Test / Check | What it verifies |
| 1 | ping 127.0.0.1 | Local TCP/IP stack |
| 2 | ping [local-IP] | Local interface configuration |
| 3 | ping [gateway-IP] | Local subnet and gateway reachability |
| 4 | ping [remote-IP] | Remote network connectivity |
| 5 | ipconfig /all | IP, subnet mask, DHCP and gateway |
| 6 | Check APIPA | DHCP assignment failure |
| 7 | Verify subnet mask | Local versus remote decision |
| 8 | Verify gateway | Next-hop configuration |
| 9 | show ip nat translations | NAT translation entries |
| 10 | show ip nat statistics | NAT operational statistics |
| 11 | debug ip nat | Real-time NAT troubleshooting |
Conclusion
Successful IPv4 troubleshooting is not about randomly changing configurations or rebooting network devices until connectivity returns. It is about understanding how packets travel through a network and identifying precisely where communication fails. By following the inside-out troubleshooting method, you can systematically investigate:
- Local TCP/IP stack problems using loopback testing.
- Interface configuration problems using local IP testing.
- DHCP failures using APIPA identification.
- Subnet mask mismatches affecting local and remote communication.
- Default gateway errors preventing access to remote networks.
- NAT and PAT configuration problems preventing internet connectivity.
The next time a user reports a network connectivity issue, resist the temptation to immediately investigate the router. Start with the host, follow the packet's journey, verify each stage, and let the evidence guide your investigation.
Remember: Don't guess. Don't randomly reboot. Follow the data, trust the troubleshooting process, and solve the problem systematically!
Author Laxmi Goswami Updated on 2026-11-07