RHCE Practice Lab initial Configurations Explained
The RHCSA/RHCE practice lab needs at least two computers. If you have two dedicated computers, you can use them to set up a physical lab. If not, you can create two virtual computers on a physical computer and use them to set up a virtual RHCSA/RHCE practice lab. VirtualBox and VMware Workstation are the most popular and widely used virtualization software.
VirtualBox and VMware create independent virtual computers by default. In this state, we can not use them to practice RHCSA/RHCE exam questions. RHCSA/RHCE syllabus requires a server/client setup for practice. We use the server system to configure the given task and the client system to test and verify it. To use virtual computers in this model, we must add them to a single network. VirtualBox and VMware allow us to create virtual networks.
The previous parts of this tutorial series explain how to use VirtualBox and VMware Workstation to prepare virtual computers to practice RHCSA/RHCE exam topics.
This tutorial is part of the tutorial series 'How to create, configure, and set up a virtual lab on VMware Workstation or VirtualBox to practice RHCSA/RHCE exam topics'. Other parts of this series are the following.
Chapter 01:- RHCE Practice Lab Setup in VMWare and VirtualBox
Chapter 02:- Downloading and Installing VirtualBox
Chapter 03:- Downloading and Installing VMware Workstation Pro
Chapter 04:- RHEL Installation Step-by-Step Explained with Screenshots
Chapter 05:- RHCE Practice Lab Initial Configurations Explained
This tutorial is the last in this series. In it, we will understand how to connect virtual computers in a single virtual network.
Setting up a virtual lab on VMware Workstation
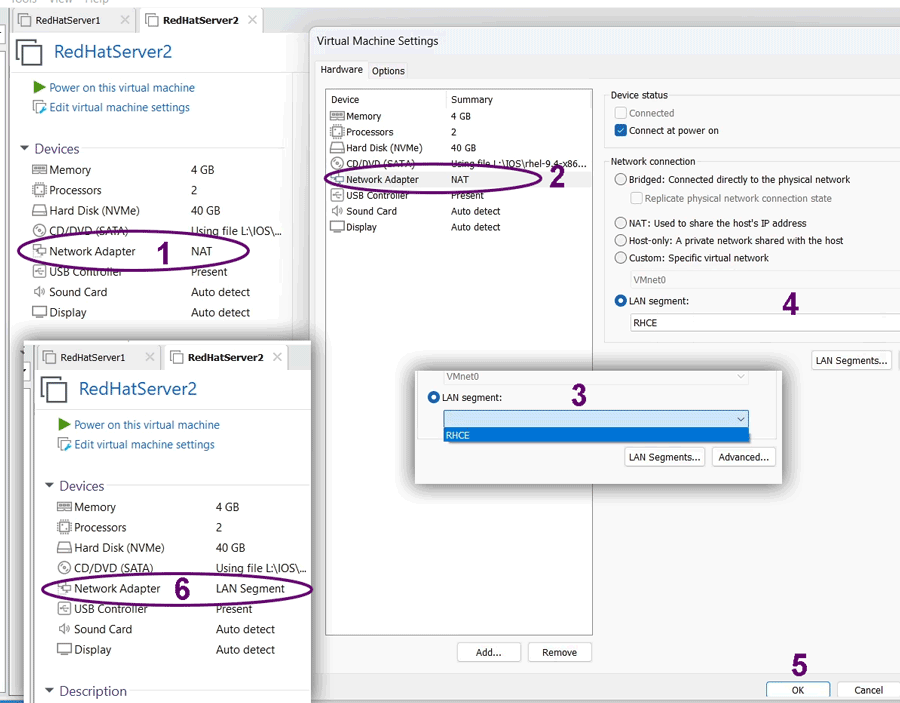
Open VMware Workstation and select the first virtual machine from the left pane. In the right pane, click the Network Adapter option.

It opens the hardware configuration of the virtual machine. Change the network connection type to the LAN segment. The LAN segment lists all available virtual networks in the dropdown. You can add a new one using the LAN segment button.
Add a new LAN segment or select an existing one. It adds the virtual computer to the selected LAN segment. Click OK to apply the change.

Repeat the same process on the second virtual computer. On the second virtual computer, select the same LAN segment as the first virtual computer.
Setting up a virtual lab on VirtualBox
Open VirtualBox and select the first virtual machine from the left pane. The right pane shows the hardware configuration of the selected virtual machine.
Click Settings. It opens a wizard that allows us to update or modify the hardware configuration of the selected virtual machine.
Click Network. It opens network-related settings.
Change the network type to Internal Network in the Attached to dropdown.
In the Name field, either select a pre-created LAN segment from the dropdown or type to create a new one.
Click OK to save changes.
On the home screen, verify the change in the network section.

On the second PC, repeat the same process. Use the same name of the Internal network on both PCs.
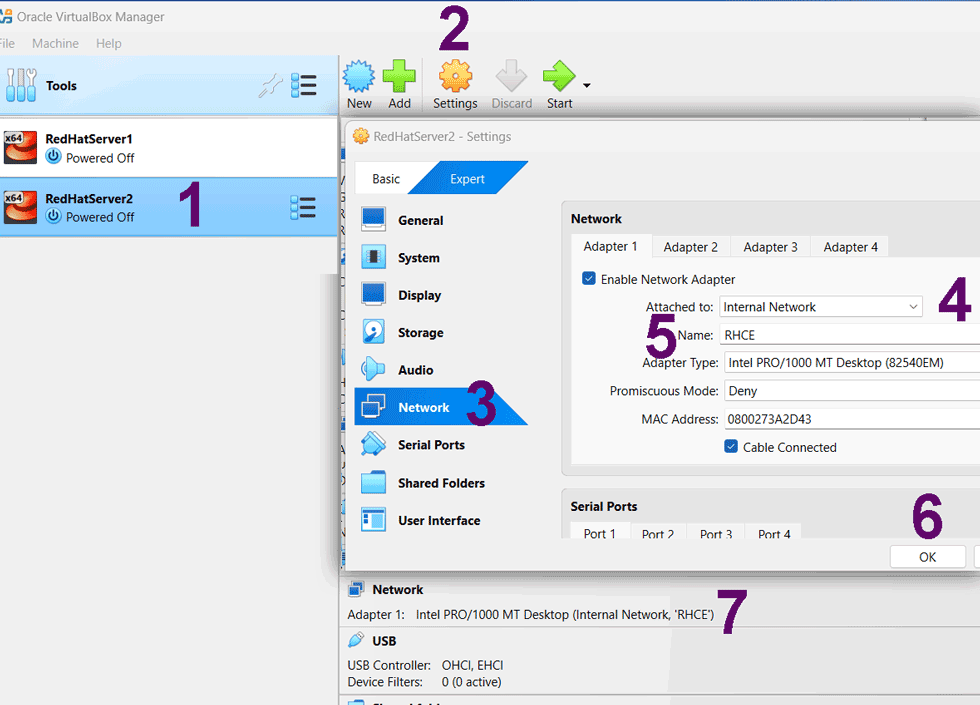
The above steps create a virtual network and add both computers.
Updating the hostname and IP configuration
We skipped the hostname and IP configuration during the RHEL installation on the first virtual computer to use the cloning feature. We created the second virtual computer using the cloning feature. Since the second virtual computer is the clone of the first virtual computer, both have default hostname and IP configuration. On a network, both settings must be unique. We must update these settings on both virtual computers after adding them to a virtual LAN segment. Since these settings are related to RHEL, the process will be the same on both the VMware Workstation and VirtualBox.
Updating IP configuration
Start the first virtual computer and log in from the root account.

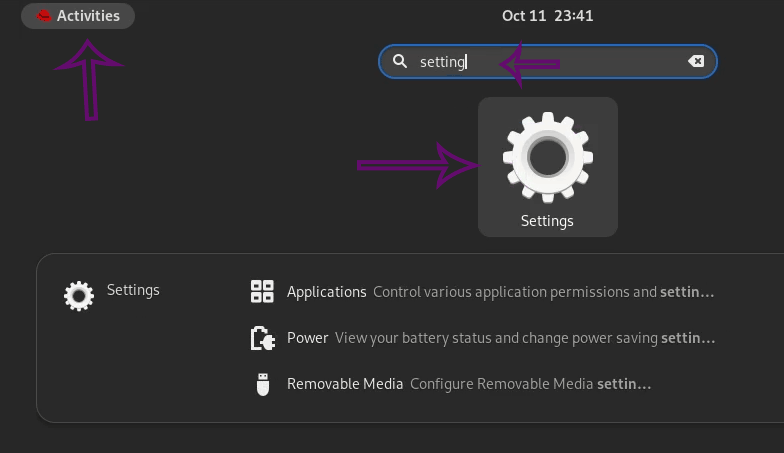
Click the Activities icon (available on the top left of the screen), type settings in the search box, and click Settings icon.
Click the Network option in the left pane and the Settings icon in the Wired section.

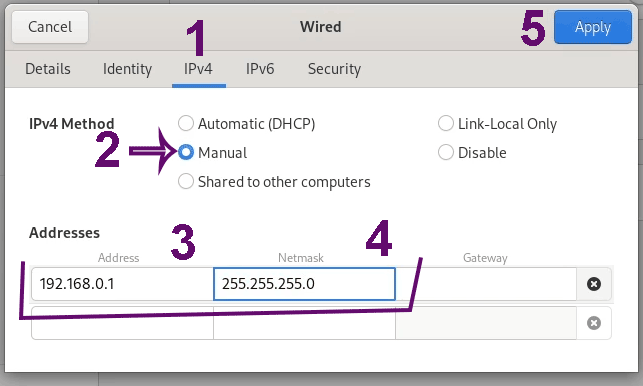
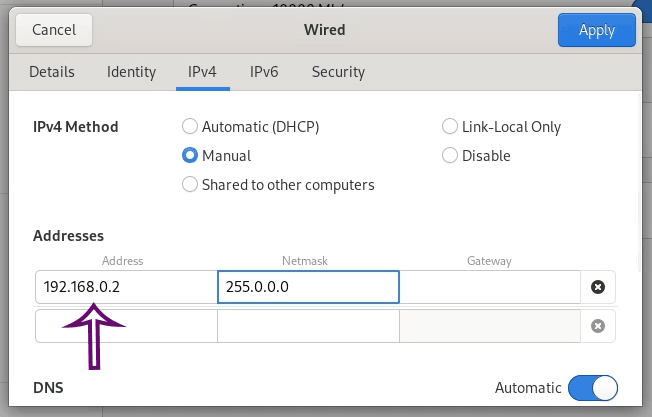
Click IPv4, select Manual method, set the IP address to 192.168.0.1 and Netmask to 255.255.255.0, and click Apply.
Click the Details tab, select the Connect automatically and Make available to other users options, and click the Apply button.

The above settings create and apply the IP configuration. It also starts the connection at boot time and makes it available to all users on the system.
Updating hostname
Click About in the left pane of the Settings wizard. Click the Device name in the right pane, change the name to Server1, and click the Rename button.

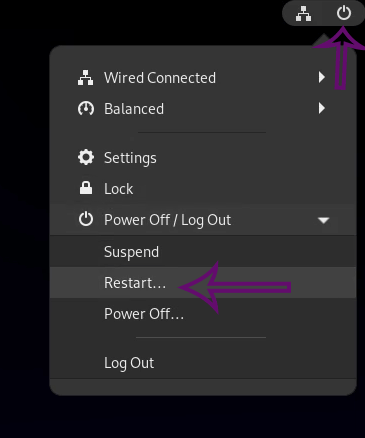
Restart the system
Use the same steps to update the hostname and IP configuration on the second PC.
Assign the IP address 192.168.0.2 and subnet mask 255.255.255.0.
Set the hostname to Server2.

After updating both, restart the system.
Testing and verifying the lab
Start both virtual PCs and log in from the root account. Open a terminal. Run the hostname command to verify the updated hostname and the ip addr command to view the IP configuration.

Use the ping command to verify the connectivity between both computers. The ping command needs the IP address of the destination computer. It sends ICMP echo requests to the destination computer. If the destination computer is accessible and up, it replies to the ping request.

The ping command keeps sending echo messages until we terminate it. Press CTRL+C to terminate it.
Common troubleshooting tips
Here are some troubleshooting steps to follow if you encounter any issues:
- Check that both virtual computers belong to the same virtual network.
- Ensure you are logged in with the root account to change the hostname and networking settings.
- Click the Connect automatically option under the Details tab of the Network settings to enable networking when the computer starts.
- Before testing connectivity, make sure both virtual computers are on.
Conclusion
Setting up a virtual RHCSA/RHCE practice lab using VMware Workstation or VirtualBox is crucial in preparing for the exam. This step-by-step guide has covered all the configurations for creating a virtual network, including creating virtual computers, installing RHEL Linux, setting up the network adapters, and updating the hostname and IP configurations for both virtual machines. Following these instructions, you can create a virtual lab environment replicating an actual server/client setup, which is essential for practising and mastering the RHCSA/RHCE syllabus.
Author Laxmi Goswami Updated on 2025-10-27