RHEL Installation Step-by-Step Explained
RHEL installation involves many steps and configurations. Understanding these steps helps us optimize RHEL installation for the best performance or a specific requirement. This tutorial explains how to perform a customized installation of RHEL for the RHCSA/RHCE exam practice lab.
RHEL Installation
Boot the system with the RHEL IOS image file or installation disk. The first screen of the installation process presents the following three options.
- Install Red Hat Enterprise Linux [version]
- Test this media & install Red Hat Enterprise Linux [version]
- Troubleshooting
The first option immediately starts the installation process.
The second option verifies the integrity of the installation media before starting the installation process. The checking process takes a significant amount of time. It is the default option. If we do not select any option, the installation process starts with this option after 60 seconds.
The third option provides options to troubleshoot the existing installation. It does not install RHEL.
We can use the Up and Down arrow keys to navigate the options. To select an option, press the Space key. Select the first option, and press the Enter key.

The next screen shows a list of supported languages we can use during the installation. Select your preferred language and click Continue.

The next screen presents a single interface to configure all settings the installer program needs to install RHEL. It categorizes settings into four sections: Localization, Software, System, and User. There is no particular sequence to configure these settings. We can configure any setting first or last.
There are two types of settings: compulsory and optional. It displays the descriptions of the mandatory settings in red. We must configure these settings. All remaining settings are optional. We can leave these settings. If we skip any optional setting, it uses the default value. It shows the default value in the description.

Let's discuss all settings and their values for our customized installation.
Keyboard
The default keyboard layout is English. This option changes the default keyboard layout. You can update it or use the default based on your preferred language.
Language support
By default, the installer program supports only the language we select on the previous screen. This option allows us to add support for an additional language. You can update it or use the default based on your preferred language.
Time and date
This option allows us to localize the time zone, date, and time.

Disable the network time, select your preferred time zone, adjust the date and time, and click Done to save the changes and return to the Installation Summary screen.
Connect to Red Hat
This setting allows us to download updates during the installation. You can use this option if you have a Red Hat account and an active subscription to Red Hat's subscription management service. If you configure this option, the installer program will check for updates during the installation. If it finds any updates, it will install them during the installation. The RHCSA/RHCE exam does not allow candidates to use an internet connection. To reflect this restriction, We will not configure the internet.
Installation source
This option allows us to change the installation media. You can use it to perform a network installation. To perform a network installation, select this option and specify the protocol, hostname, and IP address of the network server and the path to the files. To use the default source, leave this setting intact. The default source is the source we used to start the installation.
Software selection
This option allows us to select the base environment and add-on software packages. Base environments are predefined groups of software packages designed for specific usages. The Server with GUI base environment provides all the packages we need to practice RHCSA/RHCE exam questions.

Select the Server with GUI base environment and click Done to save the change.
Installation destination
This option allows us to select a disk for installation and create the necessary partition layout. By default, the installer program automatically selects the local disk for automatic partitioning. We only need to approve the action. If we approve the action, the installer program will automatically create all necessary partitions on the selected disk. The installer program will partition the entire disk. Since we are preparing this system to practice the RHCSA/RHCE exam questions, we need free space on the disk to practice disk management-related topics. To do this, we have to create the necessary partitions manually.
If you have multiple disks, select the disk you want to use for the partitioning. Then, select the Custom option and click the Done button.

If we select the Custom option on the Installation Destination screen, the following screen allows us to specify the manual layout of the disk. We will use the following disk layout to set up the environment we need to practice.
| Name | Mount point | Size | Description |
| boot | /boot | 1Gb | Save booting files |
| root | / | 30Gb | Save RHEL installation |
| swap | swap | 4Gb | Save temporary memory pages |
RedHat supports many partition types and file systems. We will learn about these later in the disk management section. To keep the installation process straightforward, select the Standard Partition.

Creating a boot partition
Click the Add button, select the mount point /boot or /boot/efi, specify the size 1G, and click the Add mount point button.

Create a /boot/efi partition if you have a UEFI-based system. If you have a BIOS-based system, create a /boot partition.
Creating a root partition
Click the Add button again, select / from the drop-down options of the Mount Point, specify 30G in the Desired Capacity input field, and click the Add mount point button.

Creating a swap partition
Repeat the same process and add the swap partition.

After creating all necessary partitions, click the Done button.

Til this time, the wizard keeps all partition-related information in RAM. It does not make any changes to the selected disk. The Cancel & Return to Custom Partitioning option allows us to discard the new layout.
Click the Accept Changes button to approve the new disk layout.

After getting approval from the user, the wizard writes the changes to the disk.
KDUMP
KDUMP is a service that creates a crash dump when the kernel crashes. Due to any reason, if the kernel crashes, this service exports a memory image of the kernel to debug and determine the cause of the crash. The default setting is on. We don't need to change this setting.
Network and hostname
This setting allows us to configure a hostname and IP configuration on all detected network interfaces. The default hostname is localhost.localdomain. The default IP configuration is off. On a standard installation, you should configure these settings. But if you are installing RHEL on a virtual machine and have a plan to clone the virtual machine, leave these settings.
These settings are system-specific settings. These settings must be unique on each system in the network. Cloning creates an exact copy of the virtual machine. If you configure these settings, you have to reconfigure these settings on all clones.
Security policy
This setting allows us to install RHEL under the restrictions and recommendations of the Security Content Automation Protocol (SCAP). It groups rules and recommendations into profiles. You can select a profile that matches your requirements in the production environment. In the lab environment, we do not need to configure this setting.
User settings
The root account is the default highest privileged account on all Linux distributions. RHEL keeps this account disabled by default. To enable it, we need to set a password. At least one user account is compulsory. You can create a new user account or set a password to the default root account. Setting a password changes its state to enable.
Since we need root privileges to perform many tasks outlined in the RHCSA/RHCE syllabus, we will enable the root account here instead of creating a new user account. Linux uses a complex password policy by default. If you use a simple password, it displays a warning message. You must confirm the password twice if you still want to use it.
Set a password to the root account.

These are the settings we need on the Installation Summary screen. To start the installation, click the Begin installation button.

The installation wizard applies all the settings we have made on the Installation Summary screen and starts installing RHEL on the disk.

The installation process can take several minutes. The last screen confirms the installation. Click Reboot System.

When the system reboots, remove the installation media you used to start the installation. After rebooting, we have to complete a couple of additional post-installation tasks. These tasks begin with a wizard. The first screen displays the welcome message.
Click Start Setup on the welcome screen.

The next screen displays the privacy setting. If we enable this option, applications can access our geographical location. You can turn it off as the applications need an internet connection to access it, and we will not configure the internet on this system.

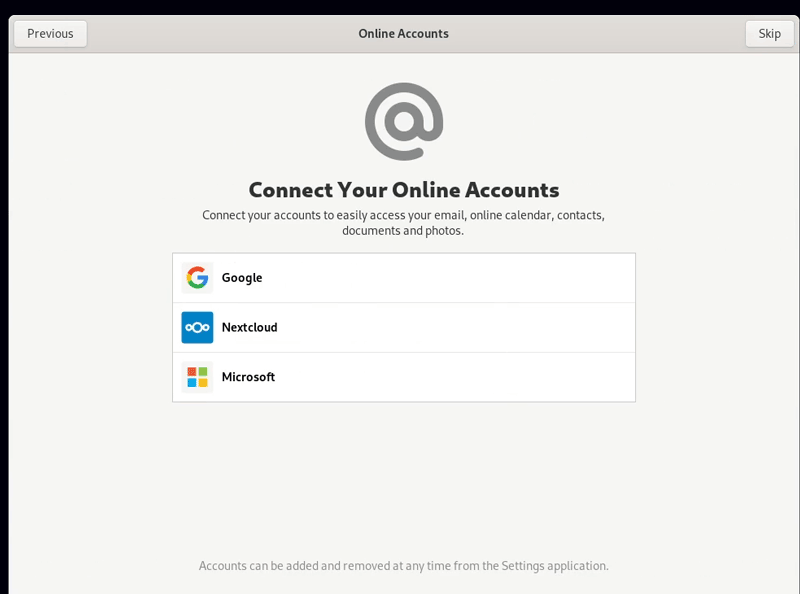
The next screen allows us to configure online accounts on this system. Since we will not connect this system to the internet, skip it.
If we do not create a user account during the installation, the following screen prompts us to make it. Specify your name. It automatically generates a username from your name. You can keep it or set a custom username of your choice.

The next screen sets a password for the user account. If you choose a simple password, confirm it twice.

Click Start Using RedHat Enterprise Linux on the next screen to close this wizard.

On the first run, RHEL presents a graphical introductory tour. On it, it presents a brief overview of features. You can take it or skip it.

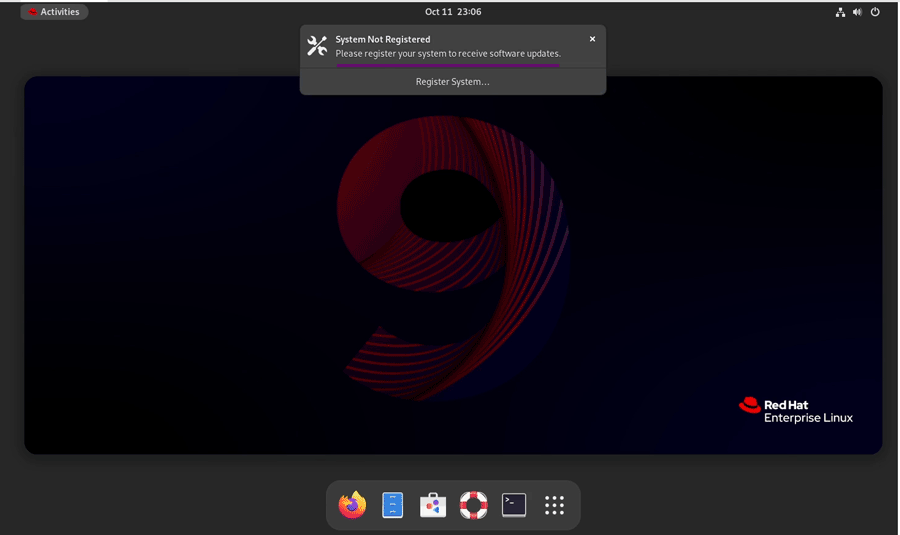
RHEL prompts us to register the system with the RedHat Network to receive software updates. Since we will not download anything from the RedHat Network, we do not need to register this system.
Now, this system is ready for use. Depending on your specific requirement, you may need to adjust a few more settings, such as hostname and IP configuration.
This tutorial is part of the tutorial series 'How to create, configure, and set up a virtual lab on VMware Workstation or VirtualBox to practice RHCSA/RHCE exam topics'. Other parts of this series are the following.
Chapter 01:- RHCE Practice Lab Setup in VMWare and VirtualBox
Chapter 02:- Downloading and Installing VirtualBox
Chapter 03:- Downloading and Installing VMware Workstation Pro
Chapter 04:- RHEL Installation Step-by-Step Explained with Screenshots
Chapter 05:- RHCE Practice Lab Initial Configurations Explained
Conclusion
Performing a customized RHEL installation requires careful consideration and understanding of each step and option available. This tutorial covered the essential parts of an RHEL installation process tailored for RHCSA/RHCE exam practice labs, including selecting the installation language, configuring essential settings like keyboard layout, language support, time and date, and, importantly, how to handle connections, software selections, and the installation destination for optimal disk management. Remember, for the RHCSA/RHCE exam lab setup; it's crucial not to configure an internet connection and to manually partition the disk to reserve free space for disk management practices.
Author Laxmi Goswami Updated on 2025-10-23