RHCE Practice Lab Setup in VMWare and VirtualBox
VMware Workstation and VirtualBox are the two most popular software programs that allow us to simulate computers. In this tutorial, we will learn how to use these to build a virtual lab to practice RHCSA/RHCE exam topics.
VMware Workstation or VirtualBox
VirtualBox is open-source software. It provides all essential features for virtualization. We can use it for any purpose. VMware Workstation is proprietary software. It delivers many advanced features. It is free only for personal use. It requires a paid subscription for commercial use. If you are a student or need virtualization only for practice, you can use it. If you are an administrator or need free software for commercial use, you can use VirtualBox.
The following table compares VMware Workstation and VirtualBox and lists the differences.
| Criteria | VMware Workstation Pro | VirtualBox |
| Open-source | No | Yes |
| Free | Only for personal use | Yes |
| Supports | Dedicated | Community base |
| Features | All | Moderate |
| Scalability | Extensive | Limited |
| Reliability | Top-notch | Moderate |
You can choose any one of these based on your requirements and budget.
Downloading and installing VMware Workstation and VirtualBox
The following tutorial explains how to download and install the latest version of VirtualBox and VMware Workstation.
Downloading and Installing VirtualBox
Downloading and Installing VMware Workstation Pro
Downloading the RHEL IOS image file
We need a RHEL installation disk or IOS image file to install RHEL on virtual computers. You can download the latest version of RHEL from its official website.
https://www.redhat.com
RedHat offers a 60-day trial licence for its latest release. This license gives us free access to RedHat repositories and Support resources for 60 days from the day we download the IOS image file.

This license does not restrict us from using the RedHat installation. RedHat releases its IOS image under the GPL license. The GPL licence allows us to use RedHat installation as long as we want. However, we cannot use RedHat repositories to download updates and packages after 60 days. Additionally, we cannot access the support facility after this period. These restrictions do not affect our Lab. We need the RHEL IOS image file to set up the practice lab. We will not download anything from RedHat repositories. We will configure a local software repository to install the required packages.
Download the latest RHEL IOS image file.

Hardware requirements for the virtual lab and host computer
Virtual computers created on VMware and VirtualBox use the host computer's hardware resources. We can create virtual computers only if the host computer has sufficient resources. We need at least two virtual computers with the following configuration to set up the RHCSA/RHCE lab environment.
| Hard disk | 40GB |
| RAM | 4GB |
| CPU | 2 |
| NIC | 1 |
| DVDROM | 1 |
To create two virtual computers with the above configuration, we need a laptop or a desktop with at least a dual-core processor, 16GB RAM, and 100GB of free disk space.

Prerequisites for the RHCSA/RHCE Lab
The following are the prerequisites for the RHCSA/RHCE Lab:-
- A system with at least a dual-core processor, 16GB RAM, and 100GB of free disk space
- The RHEL IOS image file is available on the system
- VMware Workstation or VirtualBox is installed on the system
Using VirtualBox to set up the RHCSA/RHCE lab
Start VirtualBox and click the New button on the home screen.

The virtual machine creation process starts in a wizard. The wizard has four options:
- Name and Operating System
- Unattended Install
- Hardware
- Hard Disk

The first option allows us to specify a name, location, and the type of operating system we want to install on this virtual machine. Enter RedHatServer1 in the name field and select the destination folder to save this virtual machine in the second field.
Select Linux from the Type dropdown, choose RedHat from the Subtype dropdown, and pick 64-bit from the Version dropdown.

We have two options for installing an operating system on this virtual machine: Manual and Automatic. The first option lets us manually install an operating system. The second option automatically installs specified operating. It installs the operating system with the default options. It needs the IOS image of the targeted operating system. To use this option, specify the IOS image file location in the IOS image field. Since the RHCSA/RHCE lab requires software customization, we will perform a manual installation. Leave the IOS image field empty.

The second option configures the necessary settings for the automatic installation. Since we will perform a manual installation, skip it.

The third option specifies the RAM and CPU. Set RAM size to 4GB and CPU to 2.

The fourth option configures the Hard disk and related parameters. It has the following three sub-options:-
- Create a Virtual Hard Disk Now
- Use an Existing Virtual Hard Disk File
- Do Not Add a Virtual Hard Disk
The first option creates a new virtual hard disk. The second option allows us to use an existing virtual hard disk for this virtual machine. The third option creates this virtual machine without a hard disk.
Select the first option and specify where to save the hard disk file. Set hard disk size to 40GB. We have a few more options to customize the hard disk type.
Hard Disk File Type and Variant
This option allows us to create a hard disk file that we can use on other virtual PCs. The default is VirtualBox only.
Pre-allocate Full Size
If we select this option, it allocates the entire disk space immediately.
Split into 2GB Parts
This option splits the hard disk file into files that are 2GB in size.
We do not need to select any of these options. Click Finish to create a virtual machine with the selected settings and finish the wizard.

VirtualBox lists all virtual machines on the left side of the home screen. When we choose a virtual machine in the left pane, it displays the configuration of the selected machine in the right pane.

Installing RHEL
Select the virtual machine in the left pane, click the Optical Drive option in the right pane, and select the RHEL IOS image file. It mounts the RHEL IOS image file to the optical drive.
After mounting the RHEL IOS image file, start the virtual machine.

The virtual machine boots from the mounted IOS image and starts the installation process.

The following tutorial explains the RHEL installation process.
RHEL Installation Step-by-Step Explained
Complete the RHEL installation using the above tutorial.
Cloning the Virtual machine
After preparing the first virtual computer, we can clone it to build the second virtual computer. To create a clone, power off the virtual machine, select it from the left pane, right-click, and click the Clone option.

The cloning process starts in the wizard. Enter the name RedHatServer2 for the new virtual machine, browse and choose the destination folder, select the Full Clone option, Leave the remaining settings intact and click the Finish button.

The cloning process takes a few minutes. After completing the cloning process, it lists the new virtual machine in the left pane of the home screen.

We have successfully created the necessary virtual computers with RHEL installation for the RHCSA/RHCE lab on VirtualBox.
Setting up the RHCSA/RHCE lab on VMware Workstation
The process of building the RHCSA/RHCE lab on the VMware Workstation is similar to building the RHCSA/RHCE lab on the VirtualBox. First, we create a virtual PC, then install RHEL on it, and last, we clone it to build the second PC.
Creating the first virtual computer
Start VMware Workstation, click the File menu item and click the New Virtual Machine option.

The New Virtual Machine creation wizard starts. On the first screen, we have two options: Typical and Custom. The first option includes only the necessary settings. The second option includes advanced settings for hardware customization. Select the first option and click Next.

The next screen presents three installation options.
- The first option uses the host computer's optical drive to install the operating system.
- The second option uses the IOS image for installation.
- The third option creates a virtual machine without an operating system.
The first two options perform unattended installation. To perform a manual installation, select the third option and click Next.

On the next screen, select Linux as the Guest operating system and Red Hat Enterprise Linux [Latest Version] 64 bits as the Version.

On the next screen, enter a name for the virtual machine and select the destination folder. You can use the Browse button to select the folder.

On the next screen, set the disk size to 40GB and select the option Store the virtual disk as a single file.

The wizard automatically assigns the required hardware to the virtual machine. The next screen displays a summary of the assigned hardware.

Click the Customize hardware option, set RAM to 4GB and CPU to 2, and click Close and Finish to close the wizard.

The wizard creates a new virtual machine with the specified configuration. VMware Workstation lists virtual machines in the left pane of the home screen.

Installing RHEL on the virtual machine
Select the virtual machine in the left pane, click the CD/DVD option in the right pane, select the Use ISO image file option, click the Browse button, select the RHEL ISO image file, and click Ok.

Start the virtual machine. The machine boots from the IOS image file and presents the first screen of the installation process.

Complete the installation process using the tutorial given above. After the installation, our first virtual machine is ready.
Creating the second virtual machine
You can create a new virtual machine by following the instructions above or clone the first virtual machine. To clone the first virtual machine, power it off, select it from the left pane and right-click. On the Right-click context menu, click Manage and click Clone.

The cloning process starts in the wizard. Click Next.

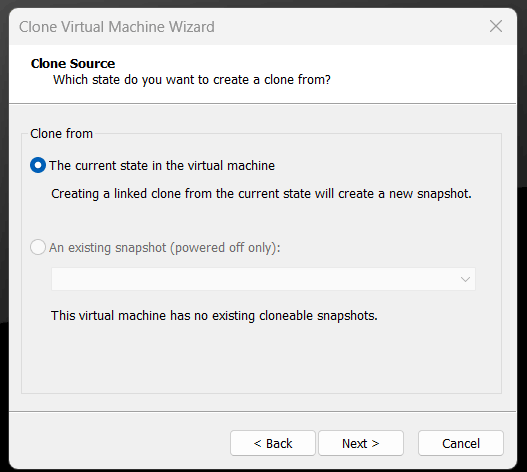
VMware Workstation allows us to save snapshots of a virtual machine. A snapshot is a particular state of a virtual machine. For example, we make some configuration changes and create a snapshot. The snapshot reflects the changes. When creating a clone, we can specify the snapshot to create one with the configurations saved in the snapshot.
Select the first option and click Next.
We can Clone a machine in two ways: full and linked. If we create a full clone, the wizard creates a copy of the existing machine. The new machine has all hardware independently. Deleting the source machine does not affect the target machine. If we make a linked clone, the wizard creates a link to the existing machine. The new machine uses the hardware of the existing machine. Deleting the source machine makes the target machine unusable.
On the next screen, select the Create a full clone option.

On the next screen, update the name and location to reflect the second machine and click Finish.

The cloning process takes a few minutes. After creating the Clone, it displays the result on the last screen.
Click Close to close the cloning wizard.

VMware Workstation lists the new virtual machine in the left pane of the home screen.

We have successfully created the necessary virtual computers with RHEL installation for the RHCSA/RHCE lab on VMware Workstation.
Initial configuration
Regardless of whether we choose VMware or VirtualBox to create virtual computers, they do not have connectivity with each other. We must connect them in a single lab to use them in the RHCSA/RHCE lab. We also need to update their hostname and IP configuration. The following tutorial explains these steps.
RHCE Practice Lab Initial Configurations Explained
Complete the initial configuration using the above tutorial. After the initial setup, the RHCSA/RHCE lab will be ready to use.
Conclusion
Setting up a virtual lab for RHCSA/RHCE exam preparation using VMware Workstation or VirtualBox is a cost-efficient way to practice exam topics covered in the RHCSA/RHCE exam syllabus. By following the steps outlined, such as choosing the virtualization software that best fits your needs, downloading the necessary RHEL IOS image, and meeting the hardware requirements, you can create a controlled environment to practice and enhance your skills.
Author Laxmi Goswami Updated on 2025-10-26