How to install and activate packet tracer in Windows
Packet Tracer is a network simulator software. Cisco developed it for its certification programs. It allows you to simulate all essential devices you need for CCNA and other entry-level certification exams. This tutorial explains how to install it on a Windows system.
Downloading Packet Tracer
You can download the latest version of Packet Tracer from the following links.
Download Packet Tracer (Official)Downloading Packet Tracer from the official site requires a Cisco account. You can create a free account and use it for downloading.
Download Packet Tracer (Mirror)The mirror provides direct downloading links for all versions of Packet Tracer.
Download the latest version or the version you want to install.
Installing Packet Tracer
After downloading the installation file, open the folder that contains the downloaded file.

Double-click the installation file. Depending on the UAC (User Access Control) setting, Windows may prompt you to confirm the installation. If it prompts, click the Yes button to confirm the installation. After confirmation, the installation process starts in a graphical wizard. The first screen of the installation wizard presents the license agreement. Select the I accept the agreement option and click the Next button.

The next screen provides an option to customize the installation directory. By default, it installs Packet Tracer in the Program Files folder of the Windows partition. To install it in a different folder, click the Browse button and select the desired folder.

The next screen allows you to customize the shortcut-link name and the location of Packet Tracer in the Start Menu. A shortcut link name will enable you to launch an application from the Start Menu. By default, the wizard uses the name Cisco Packet Tracer for both the folder name and the shortcut link name. Keep default selections and click the Next button.

The next screen allows you to create two more shortcut links to launch the Packet Tracer.
Create a desktop icon: This option creates a shortcut link on your desktop.
Create a Quick Launch icon: This option creates a shortcut link in the Quick Launch bar.
Make your choice and click the Next button.

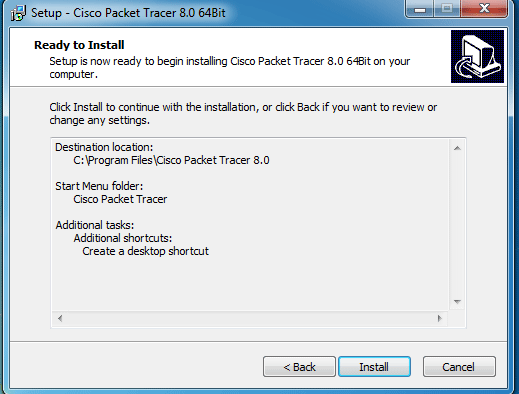
The next screen provides a summary of selections. If you want to change an option, use the Back button to get that option. To start the installation with the currently selected options, click the Install button.
The wizard displays the real-time progress of the installation.

The last screen of the wizard displays the result of the installation. If an error occurs during installation, it shows that error message. If the installation completes without any errors or warnings, it confirms the installation. If the installation is successful, it shows an option to launch the Packet Tracer when the wizard is closed. Click the Finish button to close the wizard.

Activating Packet Tracer
When you start Packet Tracer for the first time, it asks you to select the mode in which it should start. Multi-user mode allows multiple users to work simultaneously. If you do not want to share or exchange your Packet Tracer with other users, click the No button. Since version 7.0.0, you can use Packet Tracer only after logging in. When you start Packet Tracer, it presents a login box. If the Internet connection is not available, you can use the Guest account to access Packet Tracer. To use a guest account, click the Guest login button on startup.

The guest account offers limited features. This account allows you to save only three practice labs.

To remove this restriction, you must log in to Packet Tracer from a Cisco Academy account. To create a free Cisco Academy account, visit the following web page.
https://www.netacad.com/courses/packet-tracer/introduction-packet-tracer

Visit the above webpage, create a free user account, and use that user account to log in to Packet Tracer.

Successful authentication activates Packet Tracer and removes all restrictions.

To provide hassle-free access, Packet Tracer automatically saves login information and uses it to log in automatically the next time you start Packet Tracer. The Packet Tracer does not ask you to log in again until you log out manually. If you want to log out of Packet Tracer, click the File Menu item and click the Exit and Logout option from the sub-menu options.

If you log out, all restrictions apply again. You must log in again to use it without restrictions. If you use multiple copies of Packet Tracer to teach CCNA courses, there is no need to create multiple user accounts. You can use a single user account to log in to as many copies of Packet Tracer as you want. Instead of creating multiple user accounts, use only one user account to log in to all copies of Packet Tracer.
This tutorial is part of the tutorial "Installing, Configuring, and Managing Packet Tracer and GNS3". Other parts of this tutorial are as follows:
Chapter 01 How to install and activate Packet Tracer in Windows
Chapter 02 How to install and start Packet Tracer in Ubuntu
Chapter 03 Difference between emulation and simulation
Chapter 04 Differences between Packet Tracer, GNS3, and Cisco VIRL
Chapter 05 What are GNS3-all-in-one and GNS3
Chapter 06 GNS3 Setup Wizard Options Explained
Chapter 07 How to Install GNS3 Explained
Chapter 08 GNS3 Terminology and Overview
Chapter 09 How to Import IOS in GNS3
Conclusion
Packet Tracer is an essential tool for anyone pursuing Cisco certifications, particularly CCNA. Its installation process on a Windows system is straightforward, requiring just a few steps from downloading the software to completing the setup. After installing it, you must log in to access all of its features. You can create a free Cisco account and use it for logging in. Overall, it serves as an effective simulation platform, making it easier for aspiring network professionals to grasp complex networking concepts and prepare for their certification exams.
By ComputerNetworkingNotes Updated on 2025-10-30