OSPF Neighborship Condition and Requirement
OSPF is a routing protocol. It shares routing information only with neighbors. Two routers become neighbors only when their Area ID, Network ID, Authentication, Hello and Dead Intervals, Stub Flag, and MTU Size match.
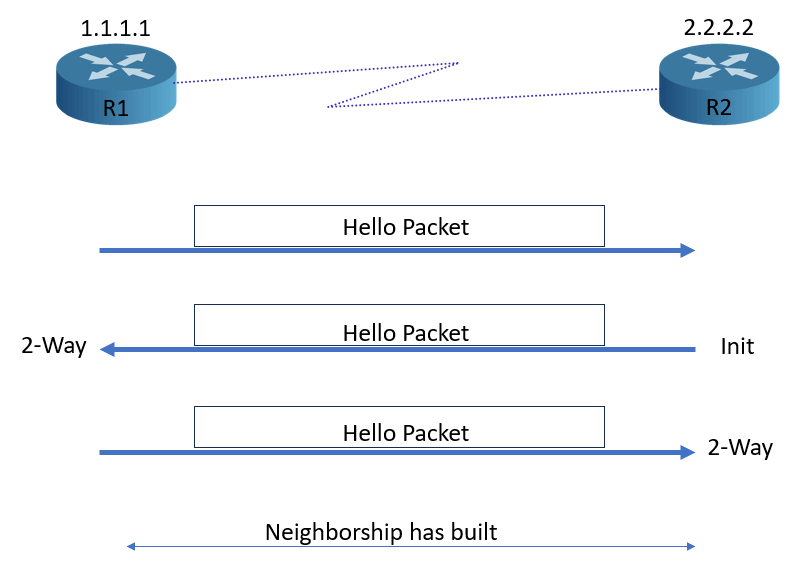
When we start an OSPF running router, it sends hello packets from all active interfaces. A hello packet contains all the parameters the receiving router needs to determine whether it should form a neighborship with the hello packet-sending router. The receiving router compares the hello packet's parameters with locally configured parameters. If both parameters match, the receiving router adds the sending router to its neighbor list and replies with its hello packet. The sending router matches the hello packet's parameters with its own parameters. If both parameters match, it adds the receiving router to its neighbor list and replies with another hello packet. At this stage, both routers become neighbors.
Routers match the following parameters to establish neighbor relationships.
- Area ID
- Network ID
- Authentication
- Hello and Dead Intervals
- Stub Flag
- MTU Size
Area ID
OSPF uses areas to scale and optimize networks. OSPF areas serve as logical boundaries for routing information. By default, routers do not share routing information beyond their respective OSPF areas. Two routers become neighbors only if they are in the same area. An area covers only the interface of the router, not the entire router. You can configure a single router to operate in multiple OSPF areas. For example, a router with a Serial interface and a FastEthernet interface can run the Serial interface in one area and the FastEthernet interface in another. To ensure that two routers are in the same area, the link connecting them must be in the same area, including the interfaces at both ends.
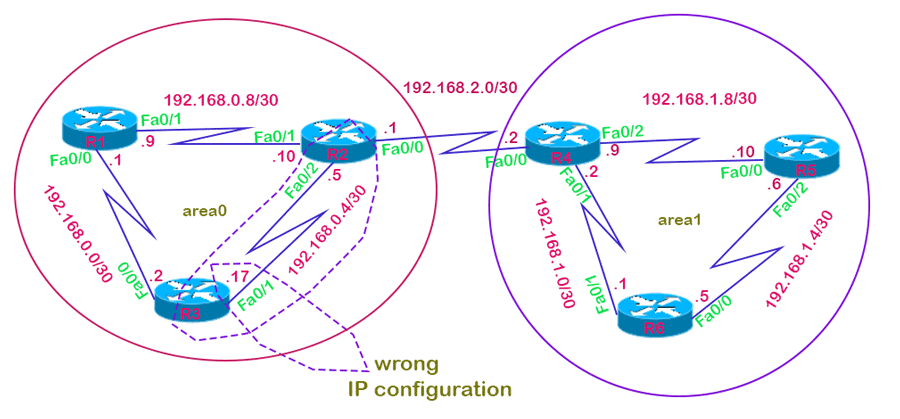
Let us take an example. In the following network, R2 and R4 belong to different areas. They will not become neighbors. R1, R2, and R3 belong to the same OSPF area. They will check the remaining parameters to build a neighborship. Similarly, R4, R5, and R6 belong to the same OSPF area. They will also check the remaining parameters to build a neighborship.

Network ID
The Network ID is not a requirement for the OSPF neighborship. However, it directly affects the process of becoming a neighbor. A link comes up only when both end interfaces have an IP address from the same subnet. If both end interfaces have an IP configuration from different IP subnets, they can not exchange IP packets. OSPF uses IP packets to share information between interfaces. If two interfaces cannot exchange IP packets, they cannot build an OSPF neighborship. In the preceding example, R2 and R3 belong to the same OSPF area. However, they cannot become neighbors. The link that connects them has an IP configuration from different subnets. The R2's Fa0/2 interface has the IP address from the subnet 192.168.0.4/30. The R3's Fa0/1 interface has the IP address from the subnet 192.168.0.16/30. The R3's Fa0/1 has the wrong IP configuration. It should have an IP configuration from the subnet 192.168.0.4/30. The correct IP address of it will be 192.168.0.6/30.
Authentication
To enhance network security, OSPF allows you to configure the password for specific areas. Routers that have the same password will be eligible for neighborship. To use this facility, you must configure the password on all routers you want to include in the password-secured network. If you skip a router, the router will not join this network. In the preceding example, if you configure a password on R1 and leave R2 unchanged, they will not become neighbors, even if all other conditions match.
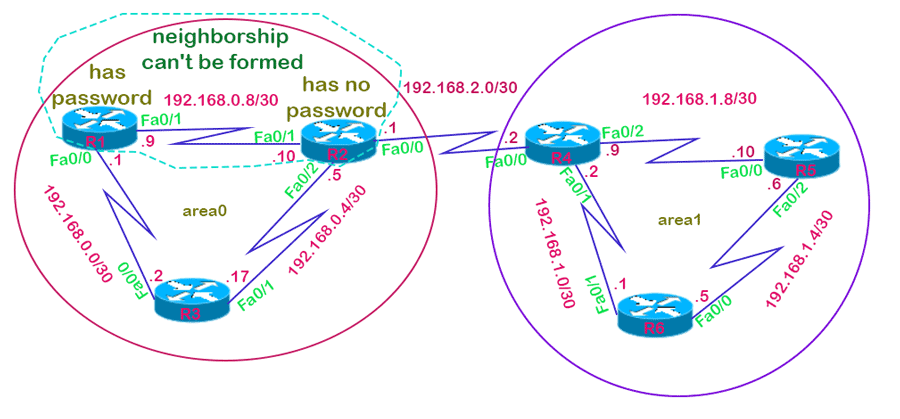
When both routers see each other's hello packets in the segment, they try to match all neighborship configuration values, including the password field. One packet contains a value in the password field, while the other is empty. In this case, the routers will ignore each other's packets.
Hello and Dead Intervals
An OSPF router uses hello packets to discover and establish neighborship with other OSPF routers in the network. It sends hello packets at a specific interval. This interval is known as the hello interval. After building the neighborship, it uses hello packets to maintain the neighborship. The default hello interval is 10 seconds. It accepts a hello packet every 10 seconds from the neighbor. If it does not receive a hello packet in a hello interval, it waits for a specific period. This period is known as the dead interval. After the dead interval, it removes the router from the neighbor list. The default dead interval is 40 seconds. Two routers will become neighbors only when their hello and dead intervals match.

Stub flag
OSPF allows us to configure certain areas as stub areas. OSPF does not flood external networks in the stub areas. Routing from stub areas to the outside world is based on a default route. Stub area configuration reduces the topology database size and memory requirement. A stub area has a single exit point. Two routers will become neighbors only when the stub area flag matches.
MTU
MTU (Maximum Transmission Unit) is an optional requirement. Routers can become neighbors even if their MTU values do not match. However, they will not be able to exchange routing updates. For error-free OSPF operation, you must maintain this value consistently across all routers.
This tutorial is part of the tutorial "OSPF Configuration and Concepts Explained.". Other parts of this tutorial are as follows:
Chapter 01 OSPF (Open Shortest Path First) Protocol
Chapter 02 RIP V/s OSPF | Differences between RIP and OSPF
Chapter 03 IGP, EGP, and Autonomous System Explained
Chapter 04 OSPF Features, Advantages, Disadvantages
Chapter 05 OSPF Fundamental Terminology Explained
Chapter 06 OSPF LSA Types and LSA Flooding Explained
Chapter 07 OSPF Area Types and Concept Explained
Chapter 08 OSPF Hello Protocol and Packets Explained
Chapter 09 OSPF RID (Router ID) Explained
Chapter 10 OSPF Neighborship Condition and Requirement
Chapter 11 OSPF DR BDR Selection Process Explained
Chapter 12 How OSPF Routers Build Adjacency Explained
Chapter 13 Shortest Path First (SPF) Algorithm Explained
Chapter 14 OSPF Single-Area Configuration Explained
Chapter 15 OSPF Stub area, Totally Stub area, NSSA, and Totally NSSA
Chapter 16 OSPF Virtual Links Explained
Chapter 17 OSPF Authentication Password and MD5 Explained
Chapter 18 OSPF Multi-Area Configuration Explained
Conclusion
OSPF is a sophisticated routing protocol that relies on establishing and maintaining neighbor relationships through a series of parameters. To form a neighborship, routers share and match configurations, including Area ID, Network ID, Authentication, Hello and Dead Intervals, Stub Flag, and MTU Size. Understanding these elements is vital for effectively managing and troubleshooting OSPF implementations, ensuring robust and reliable network communication.
Author Laxmi Goswami Updated on 2026-05-03