Adding and removing hard disks in VMware Workstation
VMware Workstation allows us to create and use virtual machines. We can use virtual machines to test applications and software in a virtual environment. A virtual machine is a virtual computer. We can use it as a physical computer. We create it on a physical computer. We can create multiple virtual machines on a computer. For example, the following tutorial explains how to make three virtual machines on a single computer and use them to create a practice lab for RHCE exam topics.
RHCE Practice Lab Setup in VMWare and on VirtualBox
One of the best things about virtual machines is that we can customize their hardware anytime. For example, we can add a new hard disk or remove an existing hard disk. Let us understand this process through an example.
Suppose We want to add a new hard disk to the virtual machine. For this, we will use the following steps.
In the first step, we will power off the virtual machine. We cannot add or remove a new hardware device on a running machine.

In the second step, click the Edit Virtual Machine Settings option.

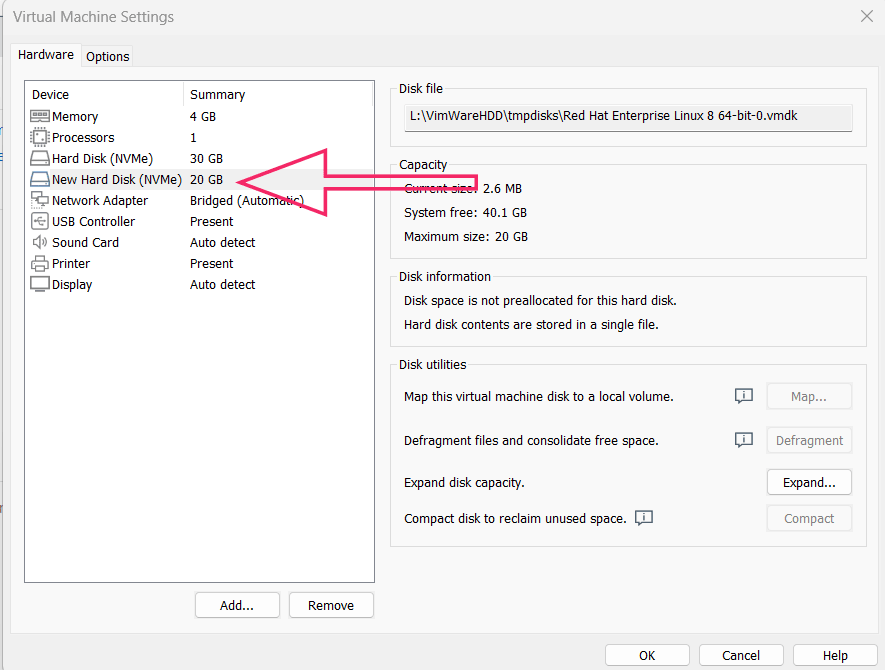
It opens Virtual Machine Settings in a new window. On the opened window, the left pane shows the current hardware devices of the virtual machine. The right pane displays the information and options about the selected device in the left pane. For example, if we pick the hard disk in the left pane, the right pane shows options related to the hard disk.
The Add button in the left pane allows us to add a new device to the virtual machine. Click the Add button in the left pane. It opens a new wizard. On the opened wizard, select Hard Disk and click Next.

The next screen allows us to select the hard disk type. There are four types of hard disks. SCSI, IDE, SATA, and NVMe.
- SCSI uses a SCSI cable. It offers a data transfer speed of 80 Mbps.
- IDE is also known as PATA. It uses an IDE cable. It provides a maximum data transfer speed of 133 Mbps.
- SATA uses a SATA cable. It provides a maximum data transfer speed of 6 Gbps.
- NVMe uses an onboard slot. It provides a maximum data transfer speed of 32 Gbps.
Select the hard disk type you want to use and click Next.

The next screen has three options.
- Create a new virtual disk
- Use an existing virtual disk
- Use a physical disk
The first option creates a new virtual disk. The second option allows us to reuse an existing hard disk. The third option lets us access the physical disk. Select the first option to create a new hard disk and click Next.

The next screen allows us to specify the hard disk size, space allocation type, and storage method.
Disk size
It provides an input box with up and down arrow keys to enter the hard disk size. The input box allows us to type the hard disk size. The up and down arrow keys let us adjust the typed size in a block size.
Allocation method
VMware can allocate disk space in two ways: immediately and gradually, as required. If you select the check box, it allocates all the disk space immediately. If you do not select the check box, it allocates a tiny portion of the disk size and adds more space when you add data to the disk.
Let us take an example. Suppose you specify the hard disk size to 20 GB. If you select this option, it will allocate all 20 GB right now. But if you do not choose this option, it will allocate only 2 to 3 GB space now. It will allocate more space when you write data to this disk. Suppose you added 1.5 GB of data to the hard disk. Then, it will expand the hard disk size to 5 GB. Similarly, the hard disk size will increase again when the specified disk space is close to fill. It will repeat this process until it reaches the maximum specified size of 20 GB.
Disk file storage method
There are two ways to store a virtual hard disk.
- Store virtual disk as a single file
- Split virtual disk into multiple files
If we use the first option, It will store the hard disk as a single file. The file size depends on the size of the hard disk we create. We can use this option if we have no intention to move this hard disk out of the host system.
If we use the second option, It will store the hard disk in multiple small-sized files. This option lets us easily move the hard disk to another system using a USB drive.
Let us take an example. Suppose we add a 20 GB hard disk. The first option will create a single 20 GB file to store this disk. The second option will create ten files of 2 GB. Moving a single 20 GB file needs a bigger USB drive than moving ten files of 2 GB. To move a 20 GB file, you need a 20 GB or bigger USB drive. However, to move a 2 GB file, you only need a 2 GB or bigger USB drive.
Select your options and click Next. It brings the last screen of the wizard.

The last screen of the wizard allows us to customize the hard disk file location. To store the hard disk file in a specific location, click the Browse option, select the folder you want to use to save the file, and click Finish.

It lists the new hard disk in the right pane of the Settings window.
Removing a hard disk
To remove an existing hard disk, select it from the right pane of the Settings window and click Remove.

It removes the disk immediately.

This tutorial is part of the tutorial series Linux disk management concepts and configurations. Other parts of this series are the following.
Chapter 01 Linux disk management terminologyChapter 02 File Management Commands in Linux
Chapter 03 Linux file system types explained
Chapter 05 List view and find hard disk names in Linux
Chapter 06 The fdisk command on Linux explained
Chapter 07 Manage Linux disk partition with the gdisk command
Chapter 08 The /etc/fstab file on Linux explained
Chapter 09 Linux disk management with the parted command
Chapter 10 The mkfs command on Linux
Chapter 11 The mount command on Linux temporary mounting
Chapter 12 The swap space on Linux explained
Chapter 13 How to create a swap partition in Linux
Chapter 14 How to configure LVM in Linux step-by-step
Chapter 15 How to configure RAID in Linux step-by-step
Conclusion
Adding a new hard disk to a virtual machine in VMware Workstation is a straightforward process that enhances the capabilities of our virtual environment. By following the outlined steps, we can customize the hardware of our virtual machines to suit our testing and development needs.
Author Laxmi Goswami Updated on 2026-01-28