How to change Default Umask Permission in Linux
Linux file permissions secure files and directories from unauthorized access. It provides two separate tools for file management. These are umask and chmod. Umask manages default file permissions while chmod manages the applied file permissions.
What is umask?
Umask stands for user file-creation mode mask. It refers to two things: a command and a set of permissions. The umask command allows us to view, set, and manage the umask permissions. Linux uses the umask permissions to calculate and assign the default file permissions to the newly created files or directories. Since umask permissions modify default file permissions, before we learn umask permissions, we must understand default file permissions.
Basic concepts of Linux file permissions
An object is a file or directory. Linux file permissions map an object with user types and define the actions a user from the specified category can perform. It categorizes users into three types: owner, group, and others.
- The owner owns the object. When a user creates an object, he becomes the owner of that object. The owner or root user can transfer ownership to another user.
- The group is a list of users who need special access. When we create a new user account, Linux makes a special group and adds the user account. This group is called the user's primary group. By default, the user's primary group gets the group permission. The owner or root user can transfer group ownership to another group.
- Apart from the owner and group members, all remaining users are others.
For each user type, there are three types of permissions: read, write, and execute. These permissions work differently for files and directories. The following table describes the action a user can take with these permissions.
| Permission | File | Directory |
| Read | View the file contents | List the directory contents |
| Write | Edit, modify, and delete the file | Create a new file or directory |
| Execute | Execute the file contents | Navigate through the directory |
It maps file permission types to user types in sections. Since there are three user types, it uses three sections. Each section includes all three permission types.
Owner (Read, Write, Execute), Group (Read, Write, Execute) and Other (Read, Write, Execute)
It uses octal notation to denote file permissions.
| Number | Permissions |
| 0 | No permission |
| 1 | Execute |
| 2 | Write |
| 3 (1+2) | Write and execute |
| 4 | Read |
| 5 (1+4) | Read and execute |
| 6 (2+4) | Read and write |
| 7 (1+2+4) | Read, write and execute |
How does umask work?
Linux defines a set of default permissions for new files and directories. The default permissions provide nearly unrestricted access to everyone. It only prevents users from executing file contents. Apart from the execute permission, it grants all permissions to everyone.

The default file permission for a file is 666. It grants the read and write permissions to the owner, group, and others. The default file permission for a file is 777. It grants the read, write, and execute permissions to the owner, group, and others. It creates a loophole in the system security. Umask fills this gap. It allows us to exclude the permission we do not want to assign to the newly created file or directory. It acts as a filter between the default file permission and the final file permission the file or directory receives.

For example, if we do not want to grant the write permission to others on new directories, we can add this to the umask permissions. Shell excludes the permissions we set in the umask permissions from the default permissions before applying them to the newly created files and directories.

Default file permissions - umask permissions = permissions the new file or directory receives
Key points:-
- Default file permissions for files and directories are 666 and 777.
- Default umask permissions are 022.
- Default file permissions are static. We can not change them. Umask permissions are flexible. We can adjust them as required.
- With default umask permissions, files get 644 (666 - 022) permissions, while directories get 755 (777-022).
The 644 permissions represent the following permissions.
Owner (Read, Write), Group (Read), Other (Read)
The 755 permissions represent the following permissions.
Owner (Read, Write, Execute), Group (Read, Execute), Other (Read, Execute)
In earlier versions of RHEL, the default umask permissions were different for the root user and regular user accounts. It was 022 for the root user and 002 for the regular users. Since version 9, the default umask is 022 for both.
Viewing default or current umask permission
The umask command without any options or arguments displays the current umask permissions.
#umask
The output shows four digits. The first digit represents the sticky bit. It configures a special permission. The next part of this tutorial explains the sticky bit. This part focuses only on bits that filter permissions for the owner, group, and others. The last three digits represent the permissions that are removed from the owner (u), group (g), and others (o) in octal notation, respectively.

Instead of the removed permissions, if you want to view the allowed permissions, use the -S option. The -S option shows the permitted permissions in symbolic notation.
#umask -S

Changing umask permissions temporary
The umask command changes umask permissions temporarily. It uses the following syntax.
#umask [new permissions]
umask 777

The umask 777 removes all permissions (read, write, and execute) from the default permissions. It is the most restrictive set of permissions. If we use this mask, we cannot edit or update files and directories after creating them.
#umask 777

umask 666

The umask 666 removes read and write permissions from the default permissions. Since default file permissions allow only read and write permissions for files, this umask removes all permissions from the file. However, default file permissions allow all permissions (read, write, and execute) for directories and this umask removes only read and write permissions, new directories will receive the execute permission.
#umask 666

umask 555

The umask 555 removes the read and execute permissions from the default permissions. It allows only the write permission.
#umask 555

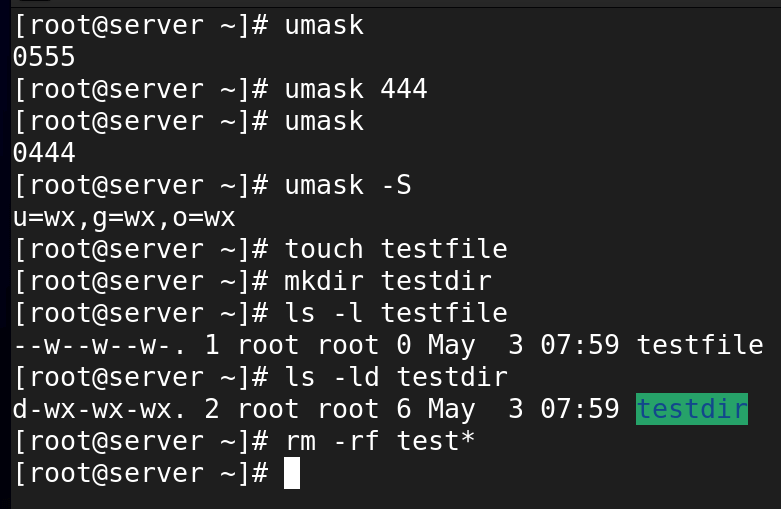
umask 444
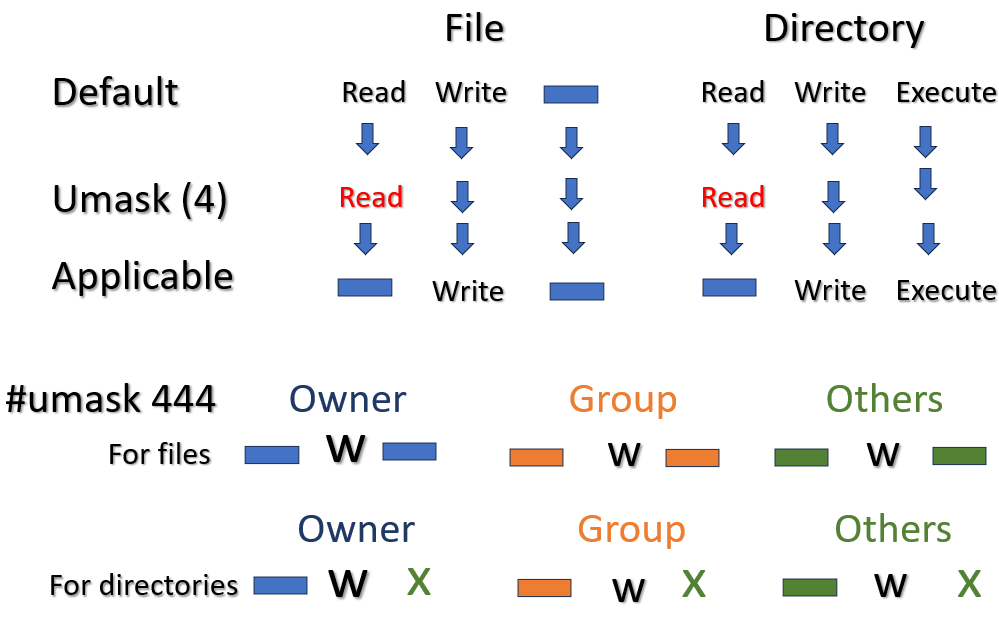
The umask 444 removes only the read permission from the default permissions. It allows the write and execute permissions. The default permission does not allow the execute permission for files. Therefore, files will not get the execute permission.
#umask 444
umask 333

The umask 333 removes the write and execute permissions from the default permissions. It allows only the read permission.
#umask 333

umask 222

The umask 222 removes only the write permission from the default permissions. It allows the read and execute permissions.
#umask 222

umask 111

The umask 111 removes only the execute permission from the default permissions. It allows the read and write permissions.
#umask 111

umask 000

The umask 000 does not remove any permission from the default permissions. It allows all permissions configured as the default file permissions.
#umask 000

umask 013

In the above examples, we used the same permissions for all user types (owner, group, and others). You can use any umask value for any user type based on your requirements. The following umask command uses 0 for the owner, 1 for the group, and 3 for others.
#umask 013

The umask 013 applies the following permissions.
| Owner | Group | Others | |
| For files | rw- | rw- | r-- |
| For directories | rwx | rw- | r-- |
If we change umask permissions, new permissions apply only to the newly created files and directories. It does not change the permissions of the existing files and directories. The following exercise verifies this.
- Change umask to 777.
- Create a file and directory and check their permissions.
- Change umask to 000.
- Create another file and directory and check their permissions.

The file and directory created later receive file permissions filtered by the updated umask. It verifies that updated umask permissions affect only the file permissions of files and directories created after it.
The umask command changes the umask permissions only for the current session. At the next login, the shell restores the default umask permissions. To verify this, use the following steps.
- Check the current umask permissions and change it to 777.
- Restart the system.
- Recheck the umask permissions.
- It will restore to default.

Changing umask settings permanently
To change the umask settings permanently, create a file in the /etc/profile.d/ directory and add the new value. For example, the following file changes the umask permissions to 077.
#cat > /etc/profile.d/custom_umask.sh
umask 077
CTRL+D
New permissions will take effect from the next login. Log out from the current session.

Login again and verify that the shell uses the updated umask permissions.
Remove the custom script file to restore or use the default umask settings again.
#umask
#touch testfile
#mkdir testdir
#ls -l testfile
#ls -ld testdir
#rm -rf /etc/profile.d/custom_umask.sh

You can also define custom settings in the /etc/profile and /etc/bashrc files. However, these files are the system default. The update process can overwrite these files if an updated version of these is available.
This tutorial is part of the tutorial " Linux file permission Explained with Examples.". Other parts of this tutorial are as follows:
Chapter 1 Linux File Permission Explained in Easy Language
Chapter 2 How to use chmod command in Linux Explained with Examples
Chapter 3 How to change default umask permission in Linux
Chapter 4 SUID, SGID, and Sticky Bit Explained
Chapter 5 How to set immutable bit with chattr command
Conclusion
This tutorial explained what the umask permissions are and how they work. It also described the steps to configure, change and manage these permissions temporarily and permanently through various examples.
Author Laxmi Goswami Updated on 2025-12-21